


60 Geac System21 commerce.connect: Implementation on the iSeries Server
5. Use the WRKLNK / command to ensure that *PUBLIC has *RWX authority to this folder.
An exclamation mark (!) in front of the stdout and stderr files means that they will be
cleared each time WebSphere is restarted, which is recommended.
6. Create the application server and wait for a message.
7. Start the application server to ensure that it is configured correctly. If it turns blue, click OK
and then stop it. Otherwise investigate the problem and correct it before you proceed.
Creating an EJB container
Follow these steps:
1. On the application server that you just created, right-click and select Create EJB
Container.
2. For Name, enter anything sensible, such as SalesOrderContainer or the same name as
the application server.
3. Create the EJB container and wait.
4. Start the application server and EJB container to ensure that they are configured correctly.
If they turn blue, click OK and then stop them. Otherwise investigate the problem and
correct it before you proceed.
Creating enterprise beans
In the container that you just created, create the enterprise beans:
1. Right-click the container and select Create-> Enterprise Bean.
2. Browse for the JAR file. Be patient because this takes time. Do not double-click the file.
3. Drag the window with another IBM window behind to verify that it is working. If it is
processing, multiple images of the front window appear.
4. If the Deployed JAR directory is set correctly on the node, then the contents of this
directory appear by default, for example /OrderManagement/Deployed for a standard
configuration. If you did not set this correctly, change the “Look in” directory at the top of
the browse window.
5. Click the _deployed JAR file, for example RoseAO_deployed.jar, to select it.
6. A message appears about the number of beans being deployed. You may see a “Not yet
deployed” message. Click OK.
7. Do not enable workload management. Select No when a message about work
management appears.
8. Then one message appears for each bean. Click OK for each message them even though
it may seem like nothing has happened.
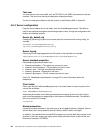
9. Start the application server, container, and beans to ensure that they are configured
correctly. If they turn blue, click OK, close the console, and leave them running. Otherwise
investigate any problems and correct them.
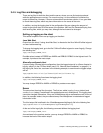
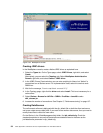
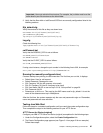
The console should look like the example in Figure 3-24.