


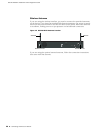


SSG 20 Hardware Installation and Configuration Guide
34 Basic Device Configuration
Date and Time
The time set on an SSG 20 device affects events such as the setup of VPN tunnels.
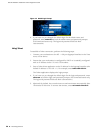
The easiest way to set the date and time on the device is to use the WebUI to
synchronize the device system clock with the workstation clock.
To configure the date and time on a device, use the WebUI or CLI as follows:
WebUI
1. Configuration > Date/Time: Click the Sync Clock with Client button.
A pop-up message prompts you to specify if you have enabled the daylight
saving time option on your workstation clock.
2. Click Yes to synchronize the system clock and adjust it according to
daylight saving time, or click No to synchronize the system clock without
adjusting for daylight saving time.
You can also use the set clock CLI command in a Telnet or Console session to
manually enter the date and time for the device.
Bridge Group Interfaces
By default, the SSG 20 device has Ethernet interfaces ethernet0/2 — ethernet0/4
grouped together in the Trust security zone. Grouping interfaces sets interfaces in
one subnet. You can unset an interface from a group and assign it to a different
security zone. Interfaces must be in the Null security zone before they can be
assigned to a group. To place a grouped interface in the Null security zone, use the
unset interface interface port interface CLI command.
The SSG 20-WLAN devices allow Ethernet and wireless interfaces to be grouped
under one subnet.
To configure a group with Ethernet and wireless interfaces, use the WebUI or CLI as
follows:
WebUI
Network > Interfaces > List > Edit (bgroup0) > Bind Port: deselect
ethernet0/3 and ethernet0/4, then click Apply.
Edit (bgroup1) > Bind Port: select ethernet0/3, ethernet0/4, and wireless0/2,
then click Apply.
>Basic: Enter the following, then click Apply:
Zone Name: DMZ (select)
IP Address/Netmask: 10.0.0.1/24
NOTE:
Only wireless and Ethernet interfaces can be set in a bgroup.