


E-7
English
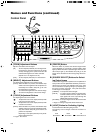
SD CARD SYSTEM
7 ~ 0 are functional only if SD card is inserted into the SD
Slot.
7 [IMAGE SELECT/ENTER] Button for
Selecting Images
Displays the miniature images of the SD card in a view of
16.
☞ Page 21 ‘Viewing Image Data Stored in SD Card’
8 [SAVE] Button for Saving SD Card
While selecting images from the camera, if this button is
pressed for more than 2 seconds, the indicator lamp will
blink and the image currently displayed will be stored in
the SD card.
☞ Page 20 ‘Storing Images in SD Card’
9 [PAGE] Buttons
To select and display images stored in the SD card.
[
]:To view the previous image.
[
]:To view the next image.
0 [DELETE] Button for Deleting SD Card
To delete selected images stored in the SD card.
When the [SD CARD] has been selected by the [SOURCE
SELECT] button 5, pressing this button for more than 2
seconds, the indicator lamp will blink and the selected im-
age will be deleted.
☞ Page 20 ‘Deleting images’
! [PICTURE MEMORY] Buttons
To store the output image in the internal picture memory
or to select and display the images stored in the picture
memory.
[1] ~ [3] : Press the button for more than 2 seconds,
the button indicator lamp # will blink and the
image will be stored in the picture memory.
Press this button to output the stored image.
[CAMERA] : To select the camera image.
☞ Page 17 ‘Saving Images in the Picture Memory’
@ [USER SETUP] Buttons for Setting
Registration
To perform settings related to value setting.
[SAVE] : The present user settings will be registered.
[USER] : The registered settings will be activated.
[DEFAULT] : Setting reverts back to default (factory) set-
ting.
☞ Page 19 ‘Saving the settings (User Setting Registra-
tion)’
# Button Indicator Lamps
Indicator lamps will blink when button ! ~ * has been
operated and the various settings are in the process of
being changed.
$ [WHITE BALANCE] Adjustment Buttons
To perform settings related to white balance.
[AUTO] : If this button is pressed, the indicator lamp
will blink while the white balance is being re-
adjusted.
[RED
]:Increase the red component of the entire
screen.
[RED
]:Decrease the red component of the entire
screen.
[BLUE
]:Increase the blue component of the entire
screen.
[BLUE ]:Decrease the blue component of the entire
screen.
☞ Page 18 ‘Adjusting White Balance’
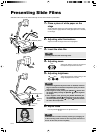
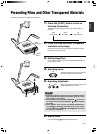
% [NEGA/POSI] Button for Switching
between Negative/Positive Film
Set to Nega when viewing negative films.
Negative will be selected when the button is pressed.
Press the button again, positive will be selected.
☞ Page 15 ‘Presenting Films and Other Transparent Ma-
terials’
^ [BW/COLOUR] Button for Switching
between Black & White and Colour
To switch the output image between Black & White and
Colour display.
Black & White image will be selected when the button is
pressed. Press the button again, Colour image will be se-
lected.
& [TEXT] Button
To make the character clearer and sharper.
Text mode will be activated when the button is pressed. To
deactivate, press the button again.
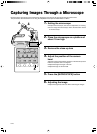
* [MICROSCOPE] Button
Press this button when capturing images from a micro-
scope.
Once the button is pressed, the zoom and focus meant for
microscope will be set.
☞ Page 16 ‘Capturing Images Through a Microscope’