53
ENGLISH
Setting Up Channels (Cont.)
Operating the Main Menu (Cont.)
OPERATE
VOL.
PAGE
BACK
PRESET
ZOOM FOCUS
COMPUTER VIDEO
QUICK
ALIGN.
AV
MUTING
W
T
MENU/ENTER
MENU/ENTER
button
Cursor buttons
PAGE BACK button
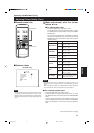
■ Remote control unit
■CHANNEL setup menu
Notes
• The selected item is shown in magenta color. Items shown
in gray color cannot be operated or set in the current mode.
• Items that can be set are different when video signals are
input and when computer signals are input.
• For dedicated source signals (corresponding frequency, etc.)
for computer signals, see page 19.
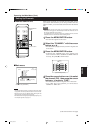
■ To set up a switcher number “SWNo” :
1
Press the cursor button 3 to move to
“SWNo”.
• The selected item is shown in magenta color on the screen.
• If any “LINE” item is not selected, you cannot choose a
“SOURCE” or “SWNo” item. First, register a “LINE” item.
2
Press the MENU/ENTER button (fix).
• The “Switcher Number Setup” menu is displayed on the screen.
3
Press the cursor button 2 or 3 to select
a number.
• Numbers that you can choose from are numbers from 1 to 20
and symbols “ 77” that signify non-registration.
• Pressing the cursor 2 makes the number smaller.
Pressing the cursor 3 makes the number larger.
• If you select “ 77”, any “SWNo” item is not registered.
• If a channel is selected, you cannot make any settings or
changes.
4
Press the PAGE BACK button.
• When you press PAGE BACK, the switcher number is set, and
the display returns to the “CHANNEL setup” menu.
• Be careful that if you set the same switcher number to a few
channels and operate using the switcher number, the youngest-
number channel is switched to because channels are read in
the order of channel numbers.
(Switcher Number Setup menu)
1
2
3
4
5
6
7
8
9
(AUTO)
CHANNEL
NTSC(480i)
PAL/SECAM
777777777
777777777
777777777
777777777
777777777
777777777
777777777
777777777
10
77777
77777
77777
77777
77777
77777
77777
77777
Y/C
VIDEO
1
2
77
77
77
77
77
77
77
77
CH
LINE
SOURCE
SWNo
SWITCHER NO.
SWITCHER
1
Note
• If used in combination with a dedicated switcher, the channels of
the projector can be automatically switched in conjunction with the
switching of the swticher.
As an example, if you have set Switcher 1 (SWNo 1) to the Channel
No. 1 (CH1), selecting Switcher 1 (SWNo 1) automatically switches
to Channel No. 1 (CH1). (Communication setup between the
projector and the switcher is required.)
For information on dedicated switchers, contact the dealer where
you purchased your projector.
G20U p.35-59 99.12.17, 10:34 AM53