


65
ENGLISH
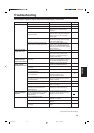
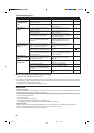
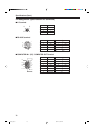
Troubleshooting
Solutions to common problems related to your projector are described here. If none of the solutions presented here
solves the problem, unplug the projector and consult a authorized dealer or service center.
Symptom Probable cause Corrective action Page
Power is not supplied.
Light is not emitted,
or light level is low.
With power on,
operation starts but
stops in a few minutes.
Video image does not
appear, or audio
sound does not occur.
While playing video,
image is sometimes
disturbed.
Video image dims.
• Is the power cord disconnected?
• Is the main power switch turned on?
• Is fuse burned out?
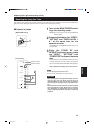
• Is the lamp-replacement opening cover
closed correctly?
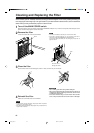
• Is the air filter closed correctly?
• Has the lamp life expired? (Has the
lamp use time reached 1000 hours?)
• Is the lens cap removed?
• Is the lamp life near its end?
• Is the air intake or exhaust area
blocked?
• Is the correct input selected?
• Are connected devices connected
correctly?
• Are signals being supplied from the
connected devices?
• Are input signals (scanning frequency,
etc.) appropriate?
• Is the source setting correctly selected?
Isn’t the wrong source (forced mode) or
channel selected?
• Is brightness adjusted correctly?
• Is volume set at minimum?
• Aren’t video and audio turned off by
pressing the remote control’s AV
MUTING button?
• Weve adjustments performed correctly
during installation?(Have you added
any new device after installation
adjustments?)
• Is focus adjusted correctly?
• Is distance too short or too long?
• Are TRACKING and PHASE adjusted
correctly?
• Insert the power cord (plug) firmly.
• Turn on the MAIN POWER switch.
• Turn off the main power switch, and
check the fuse. If it is burned out,
replace it.
• Turn off the MAIN POWER switch,
close the lamp-replacement opening
cover, and turn on the main power
switch again.
• Turn off the MAIN POWER switch, fit
the air filter correctly, and turn on the
main power switch again.
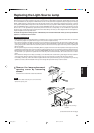
• Turn off the MAIN POWER switch,
replace with a new light-source lamp,
and turn on the MAIN POWER switch.
Reset the lamp use time after replacing
with a new lamp.
• Remove the lens cap.
• Check the lamp use time on the menu,
and if the lamp life is near its end,
arrange for a replacement lamp, or
replace a little earlier.
• Turn off the MAIN POWER switch,
remove any blocking objects, and turn
on the MAIN POWER switch again.
• Select the correct inputs with the
VIDEO and COMPUTER buttons.
• Connect connected devices correctly.
• Set connected devices correctly.
• Check if the signal is correct as input
(scanning frequency, etc.).
Input the appropriate signal.
• Set the source setting to AUTO, or to
the correct dedicated source (forced
mode) or channel.
• Adjust brightness on the menu.
• Adjust volume with the remote control’s
VOL. (+/–) buttons.
• Press the remote control’s AV MUTING
button to turn video and audio on.
• To have installation adjustments
performed, ask the dealer where your
projector or service senter.
• Adjust focus with the remote control’s
FOCUS (+/–) buttons.
• Set the projector at the correct
distance.
• Adjust TRACKING and PHASE on the
menu.
24
26
60
26, 62
26, 64
26, 61, 63
24
44
6, 8, 15, 26
27
20
–––
19
47, 49, 54
40
28
29
28
16, 17
32, 38
(To be continued on the next page)
G20U p.60-71 99.12.17, 10:42 AM65