E-42
■ Performing Various Adjustments
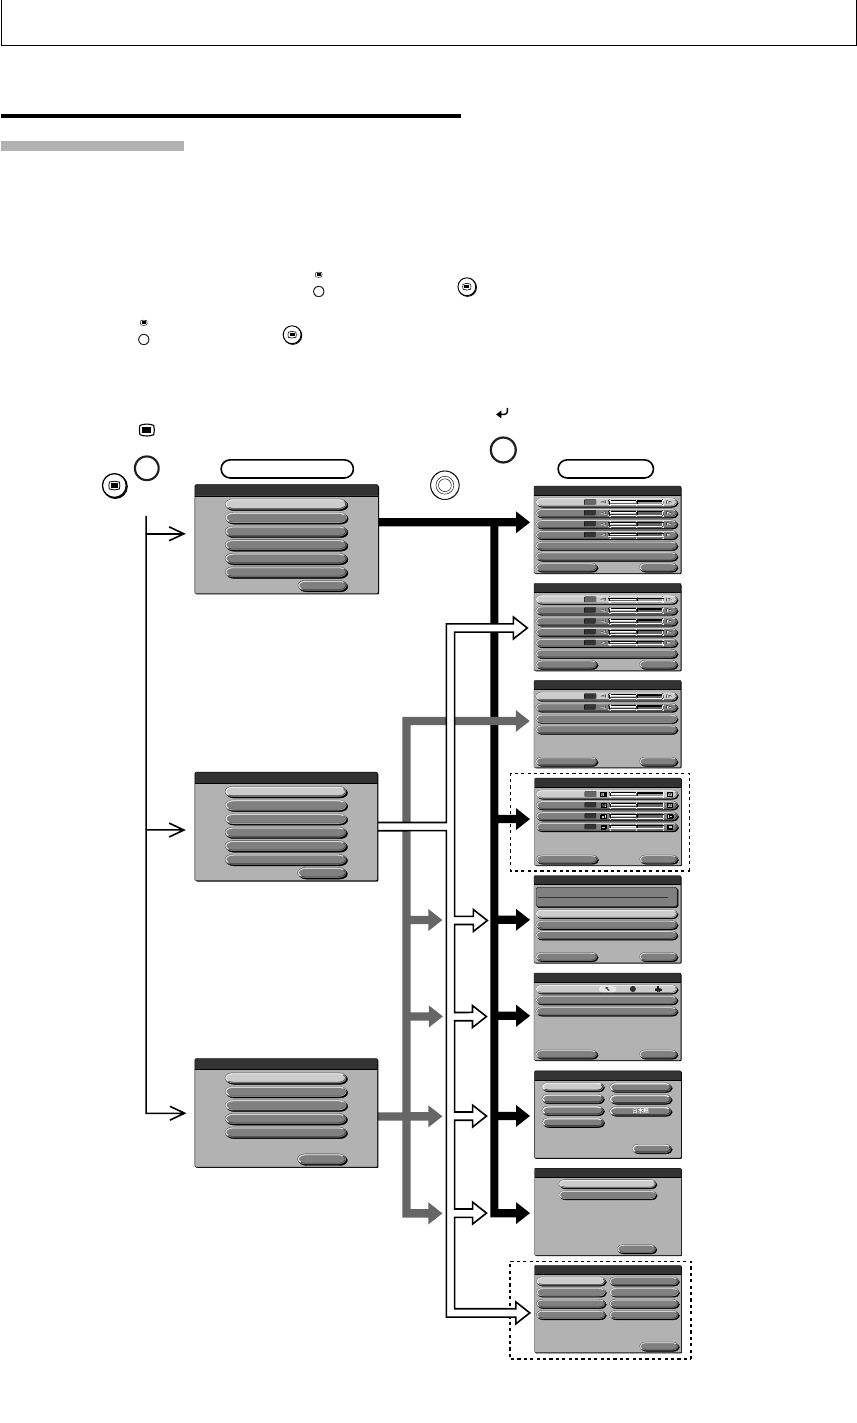
Menu Structure
You can perform various adjustments and make various settings by operating the buttons
with the menu display displayed on the projected image.
There are two menus, the “Quick menu” on which there are frequently used items, and the
“Main menu” on which more detailed settings can be done.
When a personal computer or video is connected and the power is on, you can open the
“Quick menu” by pressing the
MENU
button (or the
MENU
button on the remote controller.) (See
Page E-51 for information about the Quick menu.)
Press the
MENU
button (or the
MENU
button on the remote controller) again and the Main menu
opens. You can go to the Adjust Settings menu from the Main menu display. A map of the
menu displays is shown below.
<When PC Input is Selected>
Displayed only
when PC input
is selected
Main menu Menu
Displayed only
when OHP input
is selected
Displayed only
when PC input
is selected
Displayed only
when VIDEO
input is selected
Displayed only
when VIDEO input
is selected
Quit
MENU
Sync adjustment
Image adjustment
Setting 1
Setting 2
Language selection
Projection mode
Return
Video select
PAL B,G,H,I
Auto
PA L M
NTSC 4.43
NTSC 3.58
SEC AM
PAL N
PA L 60
Return
Projection mode
Rear
Front
Standard Return
Setting 1
Auto power off
ON / OFF
Start-up display
ON / OFF
Economy mode
ON / OFF
Lamp usage time
Input signal
24H
1024 x 768 / 48.6KHz 60Hz
Standard Return
Setting 2
Pointer type
RGB-OUT select
PC · OHP / OHP
Mute mode
Black / Logo
Standard Return
Sync adjustment
Phase
0
Horizontal
0
Ver tical
0
Clock
0
Standard Return
Image adjustment
Red
0
Blue
0
Gamma
PHOTO / TEXT
Image mode
Standard/ Natural
Standard Return
Image adjustment
Brightness
0
Red
0
Blue
0
Sharpness
123 54
Image mode
Standard
Contrast
0
Standard Return
Image adjustment
Brightness
0
Color
0
Sharpness
3
Hue
0
Image mode
Standard/ Natural
/ Natural
Contrast
0
(or the button on
the remote controller)
(or the button on
the remote controller)
<When VIDEO Input is
Selected>
<When OHP is Selected>
Quit
MENU
Setting 1
Setting 2
Image adjustment
Language selection
Projection mode
Video select
Setting 1
Setting 2
Image adjustment
Language selection
Projection mode
Quit
MENU
MENU
SET
POINTER
SET/
POINTER
MENU
Return
Language selection
English
Deutsch
Français
Italiano
Española
Svenska


