


A-61662 October 2011 6-15
4. Lift the skimmer and make sure the feeder tray is empty. The
scanner will automatically go into Manual Feed Mode, the feeder
table will rise and the transport will begin to run.
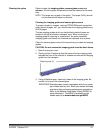
5. Once the feeder table has risen to the full-up position, feed a single,
clean white calibration sheet (Part No. 5K0449 from CAT No.
199 8103) into the scanner transport in the orientation indicated on
the sheet. A counter and a progress bar will indicate the calibration
progress.
NOTE: Do NOT open the scanner cover, shut down the scanner or
host PC while calibration is in progress.
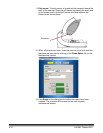
6. When the calibration function has completed all steps successfully,
a confirmation screen will be displayed.
7. Click Close. The calibration sheet will be automatically ejected from
the scanner.
NOTE: If the confirmation screen states that the calibration was
unsuccessful, turn off the scanner, close the NOU and recheck
the scanner’s optics. After cleaning, inspect the imaging guides
for contamination, excessive scratches or gouges, or dirt that
has not been removed by normal cleaning. Also inspect the
camera glass for dirt or damage, and inspect the calibration
sheet for dirt or dark marks. Inspect the LED arrays to verify all
the LEDs are operational. Then try the calibration again. If the
calibration is unsuccessful a second time, contact Kodak
Technical Support.