


4 Printer Conversion to KODAK EKTACOLOR Edge 8 and EKTACOLOR ROYAL VIII Papers • CIS-201
reference print, and if you use the same paper for
channels 10, 11, 12, 13, 14, and 15, you would input:
The Channel Balance correction will be made to
channels 10, 11, 12, 13, 14, and 15.
Note: If the Master Balance or Morning Setup channel
will use the new paper, you must include CH 00 in the
Channel Balance Shift. For example, if channels 01, 02,
03, 04, 05, 06, and 07, and the Master Balance or
Morning Setup channel will use the new paper, you
would input the following:
This Channel Balance correction will be made to
channels 00, 01, 02, 03, 04, 05, 06, and 07.
Note: If the channels that will use the new paper are not
in a continuous range, you will have to make multiple
corrections to avoid altering channels that use other
paper types.
8. Print a half-button ringaround to fine-tune the
correction:
MODE 32 (AUTO RINGAROUND)→YES→AUTO
RINGAROUND 0(0-2:COLOR 3:DEN)→0→YES
9. Repeat the steps above to match the channels to the
reference prints on Edge 7/ROYAL VII Paper. When
the Normal test print matches the Normal reference
print within one button, you can proceed to “Setting the
Paper Slope.”
Setting the Paper Slope
After matching the Normal test and Normal reference prints,
follow the same procedure you did for balance.
1. Print a ringaround from the Under and Over Printer
Setup Negatives.
2. Apply the slope correction to the paper channels that
will use the new paper by using the channel shift
command:
To correct the Under slope:
MODE 33 (CH SHIFT)→YES→CH BALANCE
SHIFT→NO→CH UNDER
SHIFT→D-IN→YES→SET UNDER
NEG→YES→input correction
To correct the Over slope:
MODE 33 (CH SHIFT)→YES→CH BALANCE
SHIFT→NO→NO→CH OVER
SHIFT→D-IN→YES→SET OVER
NEG→YES→input correction
You do not include CH 00 in the channel range, because
slope is switched off for CH 00.
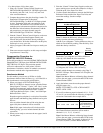
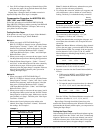
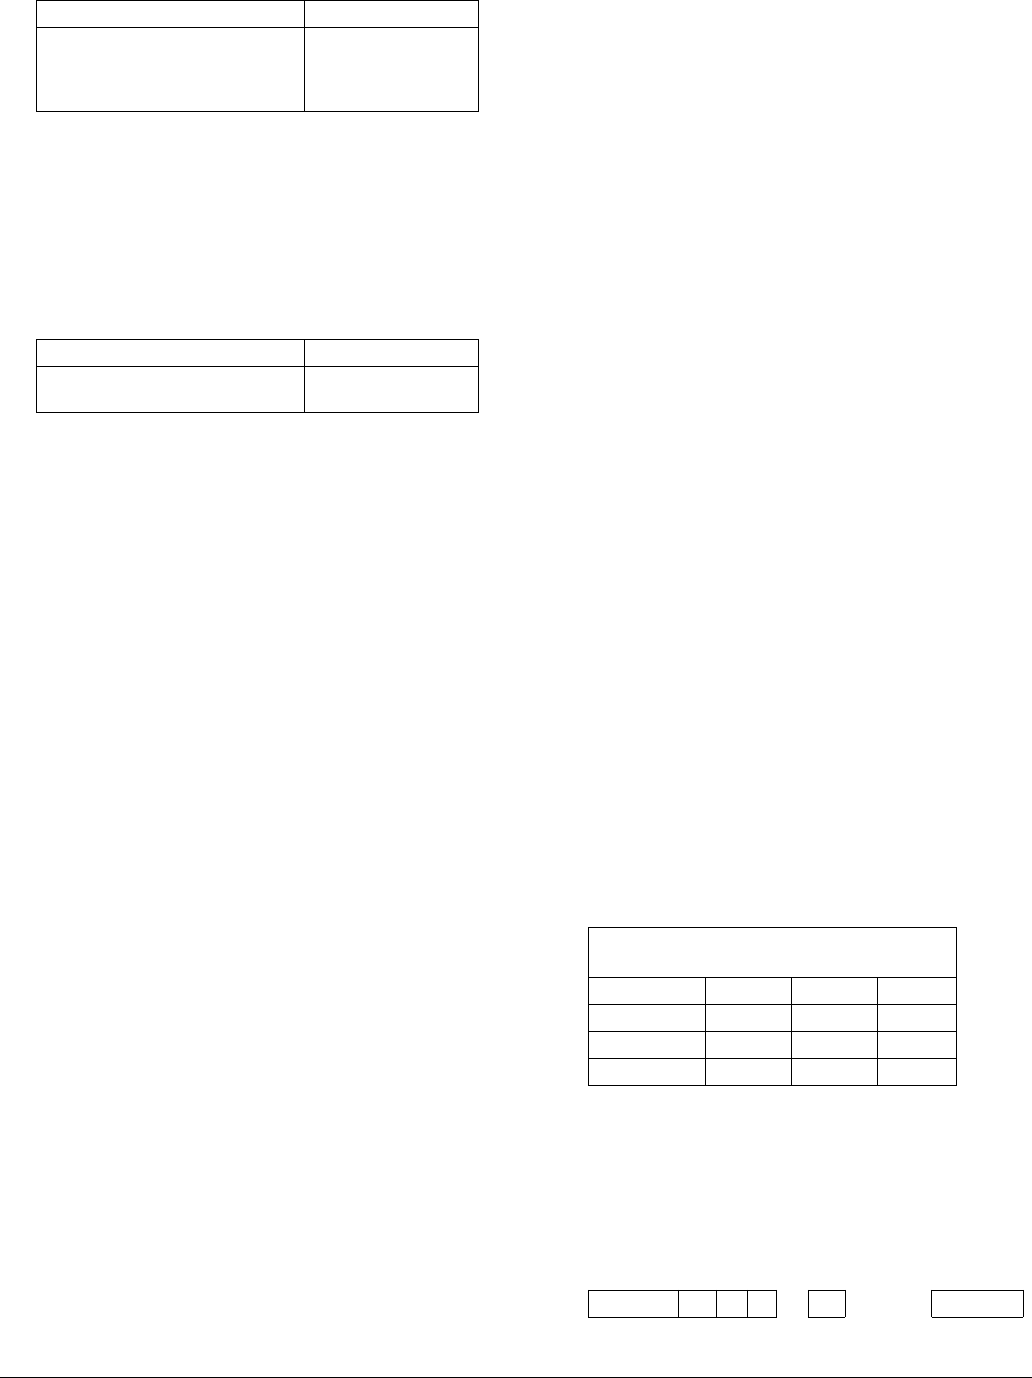
10-15 (N) Range of channels
0.0Y -1.0M 0.0C 0.0D Y/N
Input corrections
calculated above.
Press arrow keys to
move cursor.
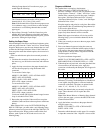
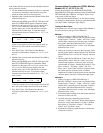
00-07 (N) Range of channels
0.0Y -1.0M 0.0C 0.0D Y/N
Input corrections
calculated above.
When Channel 00 is set up for EKTACOLOR Edge 8/
ROYAL VIII Paper, you must make a new Morning Setup
reference print to use in place of the old Edge 7/ROYAL VII
Paper reference print. When you have achieved the final
balance, make a print on CH 00 and store it to use for
Morning Setup.
Compensation Procedure for NORITSU 1801
Micro Printer
Follow this procedure to convert to KODAK EKTACOLOR
Edge 8/ROYAL VIII Paper from KODAK EKTACOLOR
Edge 7/ROYAL VII Paper. This procedure permits
conversion without the use of the printer’s built-in
densitometer.
Before You Begin
1. Save or record your current setup information. This
procedure will erase any corrections that may have been
entered.
2. Ensure that the equipment is correctly set up to lab aims.
This procedure allows crossover to the new paper
without noticeable differences in print quality.
Setup Procedure
Before your supply of EKTACOLOR Edge 7/ROYAL VII
Paper runs out, be sure that you have a Morning Setup
reference print on Edge 7/ROYAL VII Paper. If none is
available, perform a Morning Setup to make a reference print
on the old paper. Then do this:
1. Install the EKTACOLOR Edge 8/ROYAL VIII Paper
magazine.
2. Perform a Morning Setup on the new paper, and process
the print.
3. Calculate a correction to produce a visual match
between the test print on Edge 8/ROYAL VIII Paper
and the reference print on Edge 7/ROYAL VII Paper as
shown in the example. Use an X-Rite or similar
densitometer that has Status A filters (e.g., an X-Rite
881 or 891 densitometer) to measure the print densities.
Note: To obtain the difference, subtract the test-print
densities from the reference-print densities.
Add the Cyan + Magenta + Yellow difference values to
obtain an overall density reading. Then divide by 50 to
obtain the density correction:
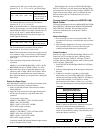
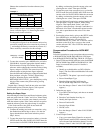
Example
Densitometer Readings—
Reference and Test Prints
Cyan Magenta Yellow
REFERENCE 75 80 73
TEST 90 87 73
Difference -15 -7 0
Density
Correction
Difference -15 -7 0 = -22 -22 / 50 = -0.4