


Hazardous voltage, current, and energy levels are present inside any component that has this label
attached. There are no serviceable parts inside these components.
CAUTION:
The heat sink and microprocessor might be very hot. Turn off the computer and wait
three to ve minutes to let the computer cool before removing the computer cover.
To replace the power supply assembly, do the following:
1. Remove all media from the drives and turn off all attached devices and the computer. Then, disconnect
all power cords from electrical outlets and disconnect all cables that are connected to the computer.
2. Remove any locking device that secures the computer cover, such as a padlock or an integrated
cable lock.
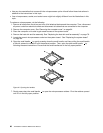
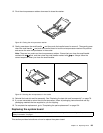
3. Remove the computer cover. See “Removing the computer cover” on page 64.
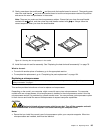
4. Place the computer on its side to gain easier access to the power supply.
5. Disconnect the power supply assembly cables from the system board and the drives. In some models,
you might need to disconnect the power supply assembly cables from the Peripheral Component
Interconnect (PCI) cards.
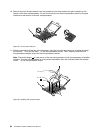
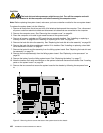
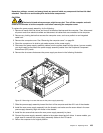
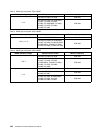
6. Remove the six screws that secure the power supply as shown in the following illustration.
Figure 55. Removing six screws that secure the power supply assembly
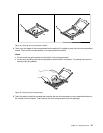
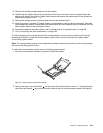
7. Slide the power supply assembly toward the front of the computer and then lift it out of the chassis.
8. Install the new power supply assembly into the chassis, and make sure the screw holes in the new
power supply assembly align with those in the chassis.
9. Install the six screws that secure the new power supply assembly in place.
10. Connect the power supply assembly cables to the system board and all drives. In some models, you
might need to connect the power supply assembly cables to the PCI cards.
11. Return the computer to its original position.
Chapter 10. Replacing FRUs 103