Scanning
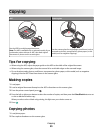
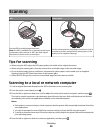
ADF Scanner glass
W
F
I
I
P
R
I
N
T
I
N
G
Use the ADF for multiple-page documents.
Note: The ADF is available only on selected models. If you
purchased a printer without an ADF, then load original
documents or photos on the scanner glass.
W
F
I
I
P
R
I
N
T
I
N
G
Use the scanner glass for single pages, small items (such as
postcards or photos), transparencies, photo paper, or thin
media (such as magazine clippings).
Tips for scanning
• When using the ADF, adjust the ADF paper guide to the width of the original document.
• When using the scanner glass, close the scanner lid to avoid dark edges on the scanned image.
• Do not load postcards, photos, small items, transparencies, photo paper, or thin media (such as magazine
clippings) into the ADF. Place these items on the scanner glass.
• Select the PDF file type if you want to scan multiple pages and save them as one file.
Scanning to a local or network computer
1 Load an original document faceup into the ADF or facedown on the scanner glass.
2 From the printer control panel, press .
3 Press the left or right arrow button to scroll to USB or the name of the network computer, and then press .
The local or network computer is the destination that will receive the scan. Wait until the printer has finished
downloading a list of the scan applications available on the selected computer.
Notes:
• If the printer is connected only to a local computer, then the printer will automatically download a list of the
scan applications.
• You may be prompted to enter a PIN if the computer requires it. Enter the PIN using the keypad.
• To assign a computer name and a PIN to the computer, see the Help for the printer software associated with
your operating system.
4 Press the left or right arrow button to select an application, and then press .
Scanning
58


