


59
20
Replacing the fuser assembly
Order a new fuser assembly when toner fog or background shading appears on printed pages. See
Ordering supplies for information on ordering a fuser assembly.
Complete the following steps to replace the fuser assembly. Refer to the documentation that comes
with the fuser assembly for detailed installation information.
CAUTION: The fuser assembly is hot! Turn the printer off and wait twenty minutes before
changing the fuser assembly.
1 Turn the printer off, unplug the printer power cord, and wait twenty minutes.
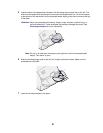
2 Remove the top cover and all installed output options. If a duplex unit is installed, remove it.
3 Remove the fuser cover.
4 Lift up and remove the fuser cleaner.
5 Open the rear access door and remove the redrive.
6 Remove the old fuser assembly.
Note: For best results, use Lexmark supplies with the printer. If you are in the U.S. or
Canada, call 1-800-438-2468 for information about Lexmark Authorized Supplies
Dealers in your area. In other countries, contact the place where you bought your
printer.
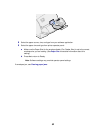
7 Install the new fuser assembly and replace the redrive.
8 Close the rear access door and replace the fuser cover.
9 If you have a duplex unit, reinstall it. Reinstall all output options and the printer top cover.
10 Plug the printer power cord into a properly grounded electrical outlet.
11 Reset the maintenance counter.