


3130
After following the preparation instructions, double-click on your My
Computer icon. A window of available disk drives will appear. Using your
right mouse button, click once on the drive or folder that you want to make
available to other users. Click on Sharing, followed by the Sharing tab. Click
on Share As. In the Share Name box, enter a name for the drive or folder you
are sharing. You can create any name, as long as the name doesn’t have spaces
(e.g.: CDrive, CD-ROM, Leela, etc.).
Next, decide on the type of access that you want to give other users.
• Read-Only access lets other users view the files on your PC.
• Full access lets users create, change, or delete files on your PC.
• Depends on Password lets users have Read-Only and/or Full access, depend-
ing on the password that you decide to give them.
Use your mouse to select the type of file sharing access that you want other
users to have. If you want to assign access password(s), type them into the
Password box(es).
When you're done, click on the Apply button, followed by OK. Your drive(s)
or folder(s) can now be accessed by other users whenever they click on their
Windows Network Neighborhood icons. If a user tries to access one of your
drives or folders that's password-protected, he or she will be asked for the
appropriate Read-Only or Full access password.
How To Share Printers
Enabling File Sharing
Phoneline 10M Network Card
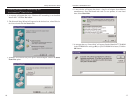
1. Windows 95 will detect the HomeLink
®
Phoneline Network card and display
a New Hardware Found window.
2. Make sure the HomeLink CD is in your CD-ROM drive. Using your mouse,
select the Driver from disk provided by hardware manufacturer option on
the screen, then click the OK button. When asked for the location of the
files, type D:\ (where D is your CD-ROM drive) and click the OK button.
3. Windows 95 will copy the appropriate network drivers to your computer. If
95 asks you to supply your original Windows 95 installation CD-ROM or
setup files, enter the appropriate path for those files (e.g.:
A:\, D:\WIN95,
c:\WINDOWS\OPTIONS\CABS, where D is your CD-ROM drive). Linksys only
provides two types of files, PCM200HA.inf and bcm*.*. All other files
are provided by Microsoft.
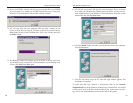
After Windows 95 is finished copying the necessary files to your computer, it
may ask you to restart your computer. Choose to do so. After your system
restarts, Click on the Start button, select Settings, Control Panel, and then
double-click on the Network icon.
Click on the Identification tab. Make sure that the workgroup name is
Workgroup, and that your computer name is unique.
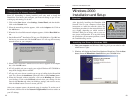
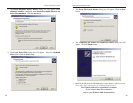
The instructions below explain how to turn on file and printer sharing in
Windows 95 so that your computer can be accessed by others and vice-versa.
Start up Windows 95. If you are asked to log in, be sure to give your correct
username and password. To set up sharing for the first time on a computer, click
on Start, Settings, Control Panel, then double-click on Network. Click on the
Configuration tab, followed by the File and Printer Sharing button. The File
and Printer Sharing window will appear.
If you'd like others to be able to access the files on your PC's hard drive, select
I want to be able to give others access to my files.
If you'd like to share your printer with other users on the network, select I want
to be able to allow others to print to my printer.
Click on the OK button. File and Printer Sharing for Microsoft Networks
should now appear in the list of installed components. Click the OK button.
When asked to restart your PC, choose to do so.
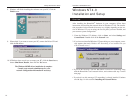
Windows 95 Version A Setup
Preparing to Use File and Printer Sharing
Linksys HomeLink
®
Series