


SAS2 Integrated RAID Solution User Guide Chapter 3: Creating Mirrored Volumes | Creating Mirrored Volumes
LSI Corporation Confidential
| August 2010 Page 15
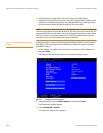
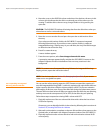
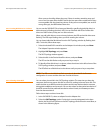
4. Move the cursor to the RAID Disk column and select a line that has a No entry in this
column, indicating that the disk is not already part of the volume you are creating.
To add the disk to the new array, change the No to Yes by pressing the space bar.
This is the Primary disk in the array.
CAUTION: The SAS2 BIOS CU deletes all existing data from the disks drives when you
select them to use in a mirrored volume.
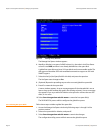
5. Move the cursor to another line and press the space bar to add the second disk to
the array.
This is the Secondary disk in the array.
6. Press C to create the array.
A menu window appears.
7. From the menu options, select Save changes then exit this menu.
A processing message appears briefly, and then the SAS2 BIOS CU returns to
the Adapter Properties window. Initialization of the new array continues in
the background.
NOTE: To create a second Integrated Mirroring volume, repeat these instructions
starting with step 2. Alternatively, follow the instructions in the following section to
create an Integrated Mirroring Enhanced or Integrated Mirroring + Striping volume.
NOTE: See the instructions in Section 3.3, Managing Hot Spare Disks, if you want to
create one or two global hot spares.
3.2.2 Creating an Integrated Mirroring
Enhanced or Integrated Mirroring +
Striping Volume
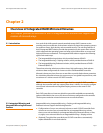
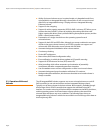
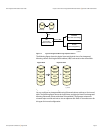
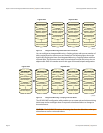
Integrated Mirroring Enhanced volumes can have from three-to-ten physical disks.
Data is written to a disk and mirrored on an adjacent disk. Integrated Mirroring +
Striping volumes can have a minimum of four and a maximum of 10 physical disks, in
even numbers. In an Integrated Mirroring Enhanced or Integrated Mirroring + Striping
volume, the data is both mirrored and striped.
Follow these steps to create an Integrated Mirroring Enhanced (RAID 1E) or Integrated
Mirroring + Striping (RAID 10) volume with the SAS2 BIOS CU. The steps begin with the
Adapter List window that appears when the configuration utility starts:
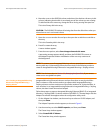
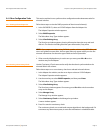
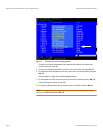
1. On the Adapter List window, use the arrow keys to select an LSI SAS adapter, and
then press Enter.
The Adapter Properties window appears, as shown in Figure 5.
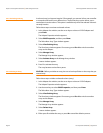
2. Use the arrow keys to select RAID Properties, and then press Enter.
The Create Array window appears.
3. Select Create RAID 1E Volume.
The Create New Array window appears.