


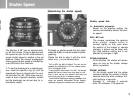
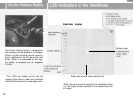

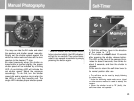
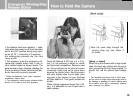

1. Align “A” on the shutter speed dial with
the white line index mark on the camera
body.
2. Be sure to set the exposure compensa-
tion scale to 0.
3. Set the aperture to the desided “f”
number according to conditions
4. When the shutter release button is
slightly
touched, an LED indicating proper
exposure will automatically light in the view-
finder. When
”
A
”
LED blinks, it indicates
over-exposure. Rotate the aperture ring to
stop down to a smaller exposure until an
LED indicates proper
expsure.
l
Blinking
“LT’ indicates under-exposure: rotate
the aperture ring
until the LED stops blinking to
increase exposure.
*
Illuminating “LT” indicates that the shutter is sat
for a relatively long exposure from
between
1
I
to
4 seconds.
When taking pictures at such slow speeds. be
careful not to move or vibrate the camera. Either
open the aperture for a higher shutter speed, or
use a
tripod,
or use a
flash.
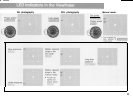
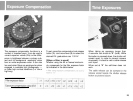
l Under AE (automatic exposure) or AEL
(AE
lock).
the LED display in the viewfinder will
~
continue to operate as long as the shutter
re-
lease
button is touched slightly. When
you
take your linger off the button, the LEDs will
~
go out.
Rotate the shutter speed dial until “AEL”
aligns with the white index mark on the
camera body.
Position the important part of your subject in
the central square of the viewfinder
-
this
will establish the correct exposure. Then
touch the shutter release button slightly and
an LED will light indicating the correct expo-
sure. After making any necessary adjust-
ments to the aperture, press completely for
your exposure. Even when light quality is
variable, an optimum exposure is possible.
If you cannot get close enough to your sub-
ject for another meter reading, make substi-
tute measurements by pointing the camera
to light and dark areas and calculate a
mean exposure value or try taking a reading
off your palm.
23