Installation
3-4 Maxtor Atlas 10K III
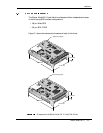
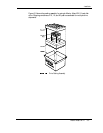
Maxtor Atlas 10K III hard disk drives are outfitted with plastic shock feet on the
bottom edge of the base casting, near the corners, beneath the side mounting holes
(translucent), and near the corners of the top cover next to the screws (black). The
shock feet give an additional level of isolation to prevent the head and disk damage
that occasionally occurs during unpacking, staging, and installation. The shock feet
attenuate the short-pulse shocks that occur when placing the drive on a hard surface.
If the drive is tested on a hard surface, it should be supported such that the shock
feet are not in contact with a hard surface (the drive should be supported in the
middle, between the shock feet).
Note: To provide optimal protection the shock feet are designed to ex-
ceed the form factor when uncompressed.
1. Open the shipping container and remove the packing assembly that contains
the drive.
2. Remove the drive from the packing assembly.
3. When you are ready to install the drive, remove it from the ESD bag.
The maximum limits for physical shock can be exceeded if
the drive is not handled properly. Special care should be
taken not to bump or drop the drive.
During shipment and handling, the antistatic electrostatic dis-
charge (ESD) bag prevents electronic component damage due
to electrostatic discharge. To avoid accidental damage to the
drive, do not use a sharp instrument to open the ESD bag.
Save the packing materials for possible future use.


