


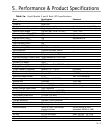

4. Startup and Shutdown
4A. UPS Startup
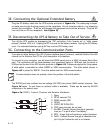
You are ready to start the equipment after installing the UPS module, optional battery module(s),
any options, and the communication cable (if used).
Follow these simple steps:
1. Connect your computer equipment.
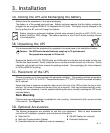
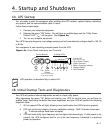
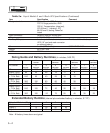
2. Depress the green "ON" button. You will hear an audible beep, and the “Utility Power
Present” LED " " will be green. See Figure 4a.
3.
Turn on any computer equipment.
Your UPS has auto-frequency and voltage sensing and will automatically configure itself to 120, 50
or 60 Hz.
Your equipment is now receiving
protected power from the UPS.
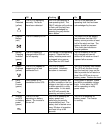
Figure 4a. Front Panel Indicators and Controls
LED operation is described fully in section 4E.
4B. Initial Startup Tests and Diagnostics
Your UPS will perform internal diagnostics as well as check utility power.
After depressing the green "On" button and starting your UPS for the first time, you will hear an
audible "beep" confirming the button has been depressed, and your UPS will perform the following
diagnostic tests:
1. All front-panel LEDs will light, allowing visual confirmation that LEDs function properly.
2. UPS will confirm the integrity of factory calibration settings. FAULT indicator illuminates
" " if internal settings have been corrupted.
3. UPS will check utility input frequency and configure itself accordingly. If utility power is not
present, the UPS configures itself to run at the last frequency it detected in a previous
power-up operation.
!
Alarm
Silence
(Controls audible alarm
& alarm/fault handlin
g)
ON
OFF
6 Status LEDs
Control Buttons
1. Inverter ON
(UPS on battery power)
2. Utility Power Present
3. Output Overload
4. Battery Charging Indicator
5. Replace Battery
6. Fault Detected
1. 2. 3. 4. 5. 6.
!
4—1