


Chapter 2: Setup 9
Step 3: Install the Adapter in Your Computer
1. After your computer shuts down completely, unplug the power cord from the back
of the computer to prevent electric shock.
2. Remove the cover from your computer. For instructions, see your computer
documentation.
Caution Electronic components are sensitive to static electricity. Always ground
yourself by touching the metal frame of your computer with your bare hand before
touching the PCI adapter or any other internal components of your computer.
3. Locate an available PCI slot on your computer’s motherboard.
Caution Before you attempt to insert your PCI adapter into the PCI slot, make sure
that the pin configuration of the slot matches that of the connectors on the bottom of
the adapter.
4. Remove the protective bracket from the PCI slot.
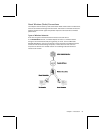
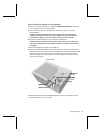
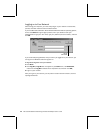
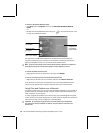
5. Insert the wireless PCI adapter into the slot, as shown in the following illustration.
Be careful to line up the connectors on the adapter with the PCI slot, and then press
evenly on the top of the card until it is securely connected to the motherboard.
When the adapter is correctly seated, the mounting bracket will be flush with the
frame of the computer.
Computer frame
Protective bracket
Screw
Wireless PCI
Adapter
Mounting
bracket
PCI slot
6. Screw the bracket of the wireless PCI adapter securely to your computer’s frame.
7. Replace the cover on your computer.