


Getting Started_29
Setting job timeout
When there is no input for a certain period of time, the machine exits the
current location. You can set the amount of time the machine will wait.
1. Press Machine Setup on the control panel.
2. Press Admin Setting.
3. When the login message appears, enter password with number keypad
and press OK. (See "Setting the authentication password" on page 28.)
4. Press the General tab.
5. Press Timers.
6. Select System Timeout.
• You can set the Held Job Timeout option to over one hour.
7. Select On.
8. Select a duration using left/right arrows.
9. Press OK.
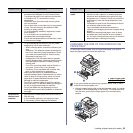
Using energy saving feature
The machine provides energy saving features.
1. Press Machine Setup on the control panel.
2. Press Admin Setting.
3. When the login message appears, enter password with number keypad
and press OK. (See "Setting the authentication password" on page 28.)
4. Press the General tab.
5. Press down arrow to switch the screen, press Power Saver.
6. Select appropriate option and time.
• Scan Power Save: Turns off the scanner lamp under the glass.
• Low Power Save: Keeps the temperature of the fuser unit under
100 °C, and turns off the fans within the machine except a core fan
for the fuser unit.
• Power Save: Turns off all the fans even for the fuser unit after
certain time.
7. Press OK.
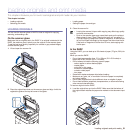
Setting the default tray and paper
You can select the tray and paper you would like to keep using for printing
job. (See "General settings" on page 73.)
1. Press Machine Setup on the control panel.
2. Press Admin Setting.
3. When the login message appears, enter password with number keypad
and press OK. (See "Setting the authentication password" on page 28.)
4. Press the General tab.
5. Press the down arrow to switch the screen and press Tray
Management.
6. Select tray and its options such as paper size and type.
7. Press OK.
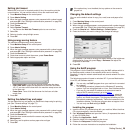
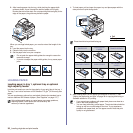
Changing the default settings
You can set the default values for copy, fax, email, scan and paper all at
once.
1. Press Machine Setup on the control panel.
2. Press Admin Setting.
3. When the login message appears, enter password with number keypad
and press OK. (See "Setting the authentication password" on page 28.)
4. Press the General tab > Default Settings > Default Option.
5. Press the function you want to change, and change its settings.
For example, if you want to change the default setting of the brightness
& darkness for a copy job, press Copy > Darkness and adjust the
brightness & darkness.
6. Press OK.
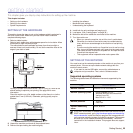
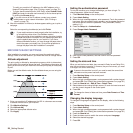
Using the SetIP program
This program is for the network IP setting using the MAC address which is
the hardware serial number of the network printer card or interface.
Especially, it helps the network administrator set several network IPs at the
same time.
The following procedure is based on windows XP. If you use Macintosh or
Linux OS, see Software section
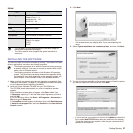
Installing the program
1. Insert the driver CD provided along with your machine. When the driver
CD runs automatically, close the window.
2. Start Windows Explorer and open the X drive. (X represents the name
of your CD-ROM drive.)
3. Double-click Application > SetIP.
4. Open the folder of the language you plan to use.
5. Double-click Setup.exe to install this program.
6. Follow the onscreen instructions to complete the installation.
If the optional tray is not installed, the tray options on the screen is
grayed out.
• You can only use SetIP program when your machine is connected
to a network.
• The following procedure is based on the Windows XP operating
system. If you are using Macintosh or Linux, See Software section.
• If you are in a non-static IP address environment and need to
setup a DHCP network protocol, go to the http://
developer.apple.com/networking/bonjour/download/, select the
program Bonjour for Windows due to your computer operating
system, and install the program. This program will allow you to fix
the network parameter automatically. Follow the instruction in the
installation window. This Bonjour program does not support Linux
• You can only use IPv4 setting for SetIP.