


43
3 GETTING THE MOST FROM YOUR MONITOR
E
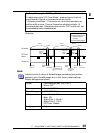
Points to check with possible solutions
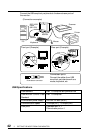
Check that the USB cable is correctly connected.
Check that the PC and OS is compliant to the
USB. (For the USB support of the system,
consult the manufacturer of each system.)
Check the PC’s BIOS setting for the USB. (For
details, refer to the manual of the PC.)
Check that the USB cable is correctly connected.
Cneect the peripherals to other downstream
ports.
If the problem is solved by doing this, contact
an EIZO dealer.
Try the followings:
• Restart the PC.
• Connect the peripherals to the PC directly.
If the problem is solved by doing this, contact
an EIZO dealer.
The power button of the APPLE keyboard does
not operate if it is connected to the EIZO USB
Hub. Please connect the keyboard directly to the
PC. Refer to the instruction of the PC for details.
Problems
1)USB function
cannot be setup.
2)• PC hangs.
• The peripherals
connected to the
downstream
ports do not
operate.
Troubleshooting
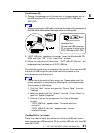
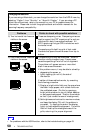
ScreenManager Pro for USB (For Windows 98)
The utility software “ScreenManager Pro for USB” is included in the
enclosed utility disk. It is used for controlling the EIZO monitor from a
PC using a mouse or keyboard. It allows control of the screen
adjustment (size, position, distortion, color, contrast, moiré, etc.) from
the OS environment. Furthermore, the adjusted screen data and the
color data can be stored as data files in the PC.
• For more information about ScreenManager Pro for USB setup, refer to
the readme file.
• When using this program, the monitor must be connected to a USB
compliant PC (OS) or another hub with the EIZO USB cable
(enclosed). For instructions, please refer to the previous page.
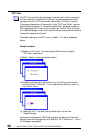
To set up the “ScreenManager Pro for USB”, execute the “setup.exe”
program in the “apps” directory of the “EIZO FlexScan CRT Utility
Disk” and follow the procedure displayed on the screen. Making sure if
the setup is completed, click “Advanced...” on the “Settings” tab in
“Display Properties” and see if the “EIZO” tab is added.
For details about the program, please refer to the Help menu in the
program.