


Installation and Configuration Chapter 2
SC-2043-SG User Manual 2-6 © National Instruments Corporation
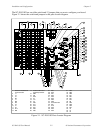
Lab/1200 Series Boards
If you are using the SC-2043-SG with a Lab/1200 Series board, you can locally sense the exact
level of the excitation voltage by routing the excitation voltage (internal or external) to ACH0,
configured by jumper W2. The SC-2043-SG also has jumper W8, which you must also
configure. Table 2-5 shows these jumper settings.
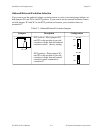
Caution: Although the factory-default setting for jumper W8 is the EX position, you
MUST
set jumper W8 to the ST position if you are using a Lab/1200 Series board.
Failure to do so can damage your Lab/1200 board if your excitation voltage
exceeds 10 V. National Instruments is
NOT liable for any damages resulting from
incorrect configuration of jumper W8. Refer to Table 2-5 for more information.
Setting jumper W8 to the ST position routes DAC1OUT (pin 12 on the Lab/1200 connector) to
the screw terminal labeled 12 in the Lab/1200 column, or DAC1OUT if you are using the stick-
on labels.
Setting jumper W2 to the EX position routes the excitation voltage to ACH0, leaving you
ACH<1..7> for strain gauge signal measurement. Setting jumper W2 to the CH0 position (the
factory setting) routes the conditioned strain gauge bridge signal (that entered via the CH0±
screw terminals) to ACH0.
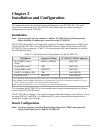
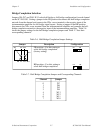
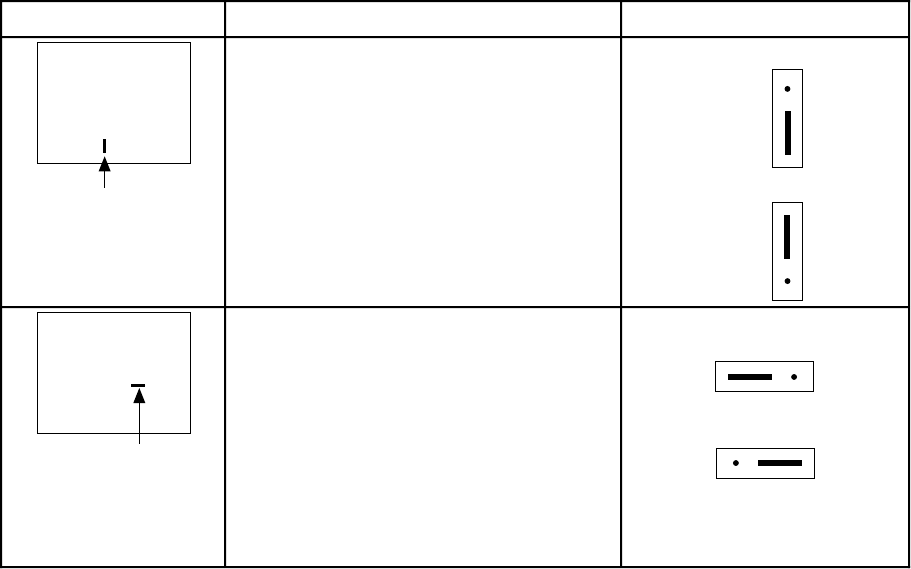
Table 2-5. Local Excitation Sense Jumper Settings for Lab/1200 Series Boards
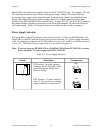
Jumper Description Configuration
W2
CH0 position—Place the jumper in
this position to route the conditioned
strain gauge bridge signal (that
entered via the CH0± screw
terminals) to ACH0. (factory setting)
EX position—Place the jumper in
this position to route the excitation
source voltage to ACH0.
W2
EX
CH0
W2
EX
CH0
W8
EX position—NEVER leave the
jumper in this position. (factory
setting)
ST position—Always keep the
jumper in this position to route the
DAC1OUT analog output signal
from the Lab/1200 board to a screw
terminal.
W8
EX ST
W8
EX ST