


CRU Replacement and Server Upgrades 4-11
Replacing or Adding Processors
The following subsections provide the procedures for removing and installing
the Xeon processor. Use these procedures when replacing or adding processors
to your system. When adding a second processor to a CPU module an identical
processor must be added to the other CPU module to provide total system
redundancy and mirroring. Each processor includes a thermal cool sheet (heat
radiation sheet) and a heat sink. Each processor installs in a processor socket on
a CPU board located in the CPU module.
Note: Your system may have up to two processors on a
CPU board. All installed processors must be matched for
speed. If replacing a processor, the replacement processor
must match the speed of all installed processors. If
upgrading a processor, all processors must be upgraded to
match.
!
CAUTION
Electrostatic discharge (ESD) can damage components;
place them on an antistatic surface. Update the CPU board
using an antistatic wrist strap attached to chassis ground.
!
WARNING
If the system was running, any processor and heat sink
installed is hot. To avoid the possibility of a burn, let the
components cool for 10 minutes before continuing with these
procedures.
Installing a Processor
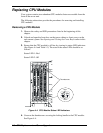
1. Remove the appropriate CPU module from the server chassis. See Removing
a CPU Module earlier in this chapter.
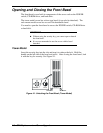
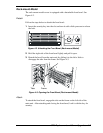
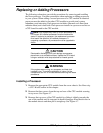
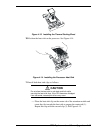
2. Remove the three screws from the top and rear of the CPU module securing
its top cover. See Figure 4-7.
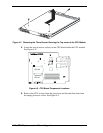
3. Remove the top cover of the CPU module by sliding it slightly towards the
rear of the module until it stops and its hooks disengage from the tab slots in
the module chassis and then pull it straight up. See Figure 4-7.