


11
1. Introduction
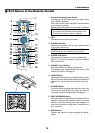
10. Select Button
This button is used for projector’s menu operation and
moving the magnified image.
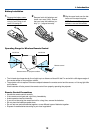
This button also works as a computer mouse when
the supplied remote mouse receiver is connected with
your computer. See page 42.
11. ENTER Button
Executes your menu selection and activates items
selected from the menu.
12. EXIT Button
Returns to the previous menu.
While you are in the main menu, pressing this button
will close the menu.
13. R-CLICK Button
Works as the mouse right button when the supplied
remote mouse receiver is connected with your com-
puter.
14. L-CLICK Button
Works as the mouse left button when the supplied
remote mouse receiver is connected with your com-
puter.
15. VIDEO Button
Press this button to select a video source from a VCR,
DVD player, laser disc player or document camera.
16. S-VIDEO Button
Press this button to select an S-Video source from a
VCR.
17. COMPUTER 1 Button
Press this button to select COMPUTER 1 input.
18. COMPUTER 2 Button
Press this button to select COMPUTER 2 input.
19. AUTO ADJ. Button
Use this button to adjust an RGB source (COMPUTER
1 or 2) for an optimal picture. See page 35.
20. LAN Button
Press this button to select the LAN (Local Area Net-
work) connection.
21. PIC-MUTE Button
This button turns off the image and sound for a short
period of time. Press again to restore the image and
sound. See page 39.
22. VOLUME +/– Buttons
Press (+) to increase the volume and (–) to decrease
it. See page 35.
23. FREEZE Button
This button will freeze a picture. Press again to re-
sume motion. See page 39.
24. HELP Button
Provides the Information screen. See page 40.
25. ASPECT Button
Press this button to display the Aspect Ratio select
menu. See page 81.
26. VIEWER Button
Press this button to select the Viewer source. See page
64.
27. SLIDE +/- Buttons
Press (+) to select the next folder or slide and press
(–) to select the previous folder or slide.
28. PICTURE Button
Press to display the picture adjustment screen. Press-
ing this button sequentially selects "Brightness" →
"Contrast" → "Color" → "Hue" → "Sharpness" → "Wall
Color". See pages 79 and 80.
29. 3D REFORM Button
Press this button to enter 3D Reform to correct the
keystone (trapezoidal) distortion, and make the im-
age square. See pages 33 and 43.