


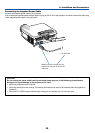

24
2. Installation and Connections
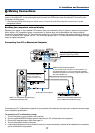
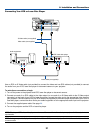
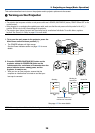
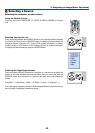
Inserting the PC Card
1. Turn off the main power switch before inserting the
PC card. (This step is needed only when the wireless
LAN card being inserted into the projector's PC
CARD slot)
2. Hold the PC card horizontally and insert it slowly into
the PC card slot with its top facing up.
The eject button pops out once the PC card is fully inserted.
Check that the PC card is fully inserted.
NOTE: Do not try to force the PC card into the slot or you may bend
the pins inside the slot.
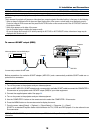
Inserting and Removing a PC Card
To insert the NEC optional wireless LAN card or a PC memory card (also referred to as PC card in this manual), follow
the steps below.
CAUTION:
* Direction for Inserting the PC Card
The PC card has a top and bottom and must be inserted into the PC card slot in a specific direction. It
cannot be inserted backwards or upside-down.
Attempting to force it into the slot in the wrong direction may break the internal pin and damage the card
slot. Refer to the PC card's operating instructions for the proper direction of insertion.
* Back up your PC card's data in case it will need to be restored.
*To prevent electrostatic discharge damage to the wireless LAN card, wear an anti-static wrist strap. If no
wrist strap is available, ground yourself by touching metal such as a door knob.
PC card (not supplied)
Eject button
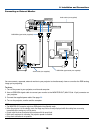
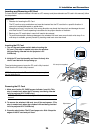
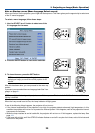
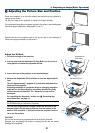
Removing the PC Card
1. Make sure that the PC CARD access indicator is not lit. (This
step is needed only when the PC memory card being inserted
into the projector’s PC CARD slot.)
NOTE: The PC CARD access indicator lights while its data is being
accessed.
2. To remove the wireless LAN card, turn off the main power. (This
step is needed only when the wireless LAN card being inserted
into the projector's PC CARD slot)
3. Press the eject button. The PC card pops out a little. Grasp the
edges of the PC card and pull it out.