


English-23
English
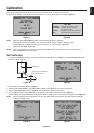
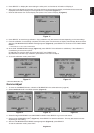
5. Press SELECT on Display B to start reading the white point* and luminance information of Display A.
6. After copying the Display A information, the target luminance and target chromaticity coordinates will be stored and
displayed in the OSD of Display B. The target value is not adjustable (Figure 11).
7. Remove USB sensor from source Display A and place in the center of Display B (Figure 8).
Figure 11
8. Press SELECT to start the copy calibration. Copy calibration may take several minutes depending on the user settings.
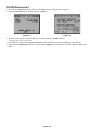
9. Once the calibration is successfully completed, the white points* and luminance of Display A and Display B should match.
After the CALIBRATION SUCCEEDED message appears (Figure 12), press SELECT to continue into the FINE TUNING
MODE*
1
.
*1: MD213MG does not have FINE TUNING MODE.
10.At the FINE TUNING MODE message (Figure 13), press SELECT if the calibration is satisfactory. If the calibration is
unsatisfactory, there are two options:
(A) Manually fine tune the white point using the “LEFT” and “RIGHT” keys.
(B) Restart the automatic copy calibration, press SELECT and return to Step 3.
11. To end the calibration mode, press “EXIT”.
Figure 12 Figure 13
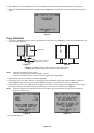
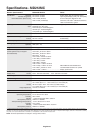
Gamma Adjust
1. To show the CALIBRATION menu, select the CALIBRATION in the advanced menu (page 20).
2. Select GAMMA ADJUST in the Mode selection (Figure 14).
3. Select the target UNIFORMITY and UNIFORMITY LEVEL. Press SELECT to go to the next section.
4. Set the target LUMINANCE (cd/m
2
) (Figure 15). Press SELECT to start the calibration. This may take several minutes
depending on user setting.
5. After the CALIBRATION SUCCEEDED message appears (Figure 16), press SELECT.
To end the calibration mode, press “EXIT”.
Figure 15 Figure 16
Figure 14
* MD212MC/MD213MC only.