


Advanced Settings
115
N300 Wireless Router WNR2000v4
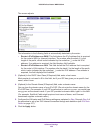
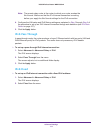
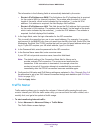
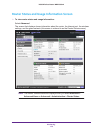
The information in the following fields is automatically detected by the router:
• Router’s IPv6 Address on WAN. This field shows the IPv6 address that is acquired
for the router’s WAN (or Internet) interface. The number after the slash (/) is the
length of the prefix, which is also indicated by the underline (_) under the IPv6
address. If no address is acquired, the field displays Not Available.
• Router’s IPv6 Address on LAN. This field shows the IPv6 address that is acquired
for the router’s LAN interface. The number after the slash (/) is the length of the prefix,
which is also indicated by the underline (_) under the IPv6 address. If no address is
acquired, the field displays Not Available.
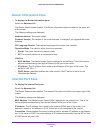
3. In the Login fields, enter the login information for the ISP connection.
This is usually the name that you use in your email address. For example, if your main
mail account is JerAB@ISP.com, then you would type JerAB in this field. Some ISPs (like
Mindspring, Earthlink, and T-DSL) require that you use your full email address when you
log in. If your ISP requires your full email address, type it in this field.
4. In the Password field, enter the password for the ISP connection.
5. In the Service Name name field, enter a service name.
If your ISP did not provide a service name, leave this field blank.
Note: The default setting of the Connection Mode field is Always on to
provide a steady IPv6 connection. The router never terminates the
connection. If the connection is terminated, for example, when the
modem is turned off, the router attempts to reestablish the connection
immediately after the PPPoE connection becomes available again.
6. Configure the LAN setup and IPv6 filtering settings as explained in Step 3 through Step 5 of
the procedure to set up an IPv6 Internet connection through auto detection (see IPv6 Auto
Detect on page 107).
7. Click the Apply button.
Traffic Meter
Traffic metering allows you to monitor the volume of Internet traffic passing through your
router’s Internet port. With the traffic meter utility, you can set limits for traffic volume, set a
monthly limit, and get a live update of traffic usage.
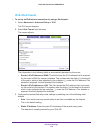
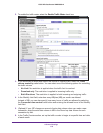
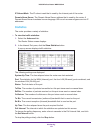
To start monitoring Internet traffic:
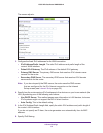
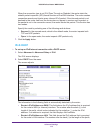
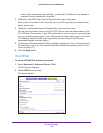
1. Select Advanced > Advanced Setup > Traffic Meter.
The Traffic Meter screen displays.