


Console-Based Management 6-1
CC
CC
hh
hh
aa
aa
pp
pp
tt
tt
ee
ee
rr
rr
66
66
CC
CC
oo
oo
nn
nn
ss
ss
oo
oo
ll
ll
ee
ee
--
--
BB
BB
aa
aa
ss
ss
ee
ee
dd
dd
MM
MM
aa
aa
nn
nn
aa
aa
gg
gg
ee
ee
mm
mm
ee
ee
nn
nn
tt
tt
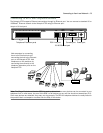
Console-based management is a menu-driven interface for the capabilities built into the Netopia 4752.
Console-based management provides access to a wide variety of features that the router supports. You can
customize these features for your individual setup. This chapter describes how to access the console-based
management screens.
This section covers the following topics:
■ “Connecting through a Telnet Session” on page 6-2
■ “Connecting a Console Cable to Your Device” on page 6-3
■ “Navigating through the Console Screens” on page 6-5
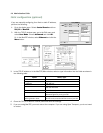
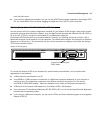
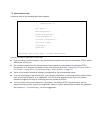
Console-based management screens contain eight entry points to the Netopia 4752 configuration and
monitoring features. The entry points are displayed in the Main Menu shown below:
■ The Easy Setup menus display and permit changing the values contained in the default connection profile.
You can use Easy Setup to initially configure the router directly through a console session.
Easy Setup menus contain up to five descendant screens for viewing or altering these values. The number
of screens depends on whether you have optional features installed.
■ The WAN Configuration menu displays and permits changing your connection profile(s) and default profile,
creating or deleting additional connection profiles, and configuring or reconfiguring the manner in which you
Netopia 4752 v5.1
Easy Setup...
WAN Configuration...
System Configuration...
Voice Configuration...
Utilities & Diagnostics...
Statistics & Logs...
Quick Menus...
Quick View...
Return/Enter goes to Easy Setup -- minimal configuration.
You always start from this main screen.