


7-10 Administration Guide
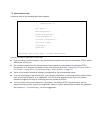
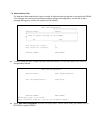
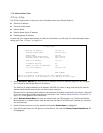
IP Easy Setup
The IP Easy Setup screen is where you enter information about your Netopia Router’s:
■ Ethernet IP address
■ Ethernet Subnet mask
■ Domain Name
■ Domain Name Server IP address
■ Default gateway IP address
Consult with your network administrator to obtain the information you will need. For more information about
setting up IP, see “IP Setup” on page 10-1.
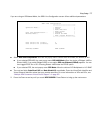
1. Select Ethernet IP Address and enter the first IP address from the IP address range your ISP has given
you. This will be the Netopia Router’s IP address.
The Ethernet IP Address defaults to an address (192.168.1.1) within a range reserved by the Internet
address administration authority for use within private networks.
Because this is a private network address, it should never be directly connected to the Internet. Using NAT
for all your connection profiles will ensure this restriction. See “Multiple Network Address Translation” on
page 11-1 of this guide for more information.
2. Select Ethernet Subnet Mask and enter the subnet mask your ISP has given you. The Ethernet Subnet
Mask defaults to a standard class mask derived from the class of the Ethernet IP address you entered in
the previous step.
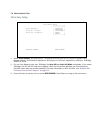
3. Press the Down arrow key until the editable field labeled Domain Name is highlighted.
4. Type the Domain Name your ISP gave you. Press Return. The next field Primary Domain Name Server will
be highlighted.
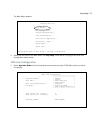
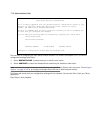
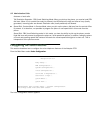
IP Easy Setup
Ethernet IP Address: 192.168.1.1
Ethernet Subnet Mask: 255.255.255.0
Domain Name: isp.net
Primary Domain Name Server: 209.3.224.21
Secondary Domain Name Server: 209.3.224.20
Default IP Gateway: 127.0.0.2
IP Address Serving: On
Number of Client IP Addresses: 100
1st Client Address: 192.168.1.100
PREVIOUS SCREEN NEXT SCREEN
Enter an IP address in decimal and dot form (xxx.xxx.xxx.xxx).
Set up the basic IP & IPX attributes of your Netopia in this screen.