


NTI KEEMUX Series PS/2 KVM Switch
6
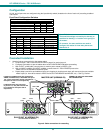
Configuration
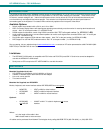
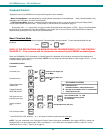
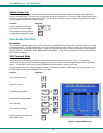
All 4, 8, and 16-port units are configured using the 8-position dip-switch (located on the front of each unit) according to tables 1
and 2 below.
Front Panel Configuration Switches
Table 1 * (default settings)
Switch SW1 SW5 SW6
STAND-ALONE SWITCH OFF* OFF* OFF*
SLAVE ON OFF OFF
MASTER W/4-PORT SLAVES OFF OFF ON
MASTER W/8-PORT SLAVES OFF ON OFF
MASTER W/16-PORT SLAVES OFF ON ON
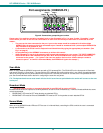
Table 2 * (default settings) Master & Slave SW2-4 Settings
SW2 SW3 SW4 Master with- Slave Setting
OFF* OFF* OFF* No Slave Attached N/A
OFF OFF OFF 1 Slave attached Slave Unit #1
OFF OFF ON 2 Slaves attached Slave Unit #2
OFF ON OFF 3 Slaves attached Slave Unit #3
OFF ON ON 4 Slaves attached Slave Unit #4
ON OFF OFF 5 Slaves attached Slave Unit #5
ON OFF ON 6 Slaves attached Slave Unit #6
ON ON OFF 7 Slaves attached Slave Unit #7
ON ON ON 8 Slaves attached Slave Unit #8
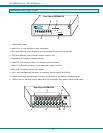
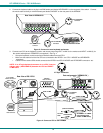
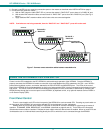
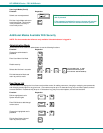
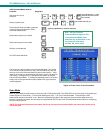
Cascaded Installation
1. Attach all slaves consecutively to the master switch.
a. Perform steps 1 and 2 under INSTALLATION on page 4 for each slave unit.
b. Configure each switch as per the tables above under CONFIGURATION before proceeding.
c. With a VEXT-xx-MM cable, connect slave #1 monitor port to master’s VIDEO 1 port.
d. With a VVKINT-xx-MM or (2) VKEXT-xx-MMs, connect slave #1’s PS/2 DEVICES ports to the
master’s CPU1 KEYBOARD and MOUSE ports.
e. Repeat steps c and d for each additional slave unit, keeping in mind that each slave will connect to the next available
master’s port (i.e. slave #2 to master’s VIDEO 2 and CPU 2 KEYBOARD and MOUSE, etc.). See Fig. 5 below.
Figure 6- Cable connections for cascading
A
bout Table 2:
These switch settings are used by the slave(s) to
establish its identity (i.e. location in the group) to
the master.
On a master, the same switches are used to
configure the master for how many slaves are
attached to it.
5VDC
2A
-
+
V
I
D
E
O
4
V
I
D
E
O
3
V
I
D
E
O
2
V
I
D
E
O
1
M
O
N
I
T
O
R
Mouse
CPU 1
C
P
U
1
C
P
U
2
C
P
U
3
C
P
U
4
CPU 2CPU 3CPU 4
Keyboard
Daisy Daisy
Out In
NTI
Tel:330-562-7070
Fax:330-562-1999
1275 Danner Dr
Aurora, OH 44202
www.nti1.com
R
PS/2 DEVICES
5VDC
2A
-
+
V
I
D
E
O
4
V
I
D
E
O
3
V
I
D
E
O
2
V
I
D
E
O
1
M
O
N
I
T
O
R
Mouse
CPU 1
C
P
U
1
C
P
U
2
C
P
U
3
C
P
U
4
CPU 2CPU 3CPU 4
Keyboard
Daisy Daisy
Out In
NTI
Tel:330-562-7070
Fax:330-562-1999
1275 Danner Dr
Aurora, OH 44202
www.nti1.com
R
PS/2 DEVICES
CPU 1
CPU 2
CPU 3
CPU 4
5VDC
2A
-
+
V
I
D
E
O
4
V
I
D
E
O
3
V
I
D
E
O
2
V
I
D
E
O
1
M
O
N
I
T
O
R
Mouse
CPU 1
C
P
U
1
C
P
U
2
C
P
U
3
C
P
U
4
CPU 2CPU 3CPU 4
Keyboard
Daisy Daisy
Out In
NTI
Tel:330-562-7070
Fax:330-562-1999
1275 Danner Dr
Aurora, OH 44202
www.nti1.com
R
PS/2 DEVICES
CPU 5
CPU 6
CPU 7
CPU 8
VVKINT-xx-MM
CPU 1-4CPU 5-8
CONNECT SLAVES FOR CASCADED
CPU CONNECTIONS
MASTER UNIT (KEEMUX-P4)
If additional 4-PORT slaves are connected to
VIDEO, PS/2 MOU CPU, & PS/2 KBD CPU ports
3 & 4, they will function and be controlled as
CPU ports 9-12 and 13-16 respectively.
- OR-
If individual CPUs are connected
to ports 3 & 4, they will function and
be controlled as CPU ports 9 & 10
respectively.
SLAVE UNIT #2 (KEEMUX-P4)
For connection of CPUs 5-8
SLAVE UNIT #1 (KEEMUX-P4)
For connection of CPUs 1-4
VEXT-xx-MM