


– 28 –
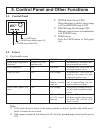
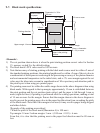
OFF
ON
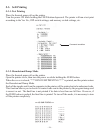
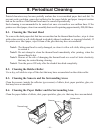
1 2 3 4 5 6 7 8 1 2 3 4
DSW 2 DSW 1
VR 1VR 3
10
9
VR 2
ERROR
FEED
POWER
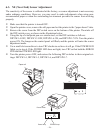
Power switch
Power lamp
ERROR lamp
Paper roll
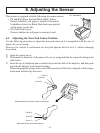
6-3. NE (Near End) Sensor Adjustment
The sensitivity of the sensor is calibrated at the factory, so sensor adjustment is not necessary
under ordinary conditions. However, you may need to make adjustments when using non-
recommended paper or when the surrounding environment prevents the sensor from working
properly.
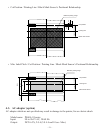
Make sure that the printer is turned OFF.
Open the printer cover, remove the roll paper and set the printer to the "paper absent" state.
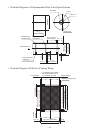
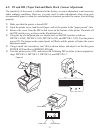
Remove the screw from the DIP switch cover on the bottom of the printer. Then take off
the DIP switch cover, as shown in the illustration below.
Using the tip of a ballpoint pen or a similar tool, set the DIP switches as follows:
DIP SW1-4 OFF, DIP SW1-5 OFF, DIP SW1-6 ON, and DIP SW1-7 ON. Turn the printer
power ON. The lamps on the control panel will ash, and the printer will enter the sensor
adjustment mode.
Use a small slot screwdriver to turn VR2 clockwise as far as it will go. If the POWER LED
lights, go to step 6. If the POWER LED does not light, turn VR2 so that both the ERROR
LED and the POWER LED light.
Turn the printer power OFF, and restore the following DIP switches to their original set-
tings: DIP SW1-4, DIP SW1-5, DIP SW1-6, and DIP SW1-7.