


60
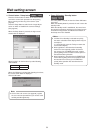
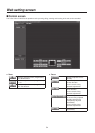
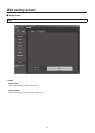
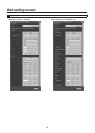
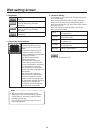
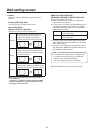
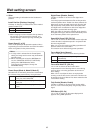
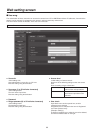
Web setting screen
Picture
Chroma Level [–3 to +3]
Set here is the color intensity (chroma level) of the
images.
AWB
This is used to execute automatic white balance (AWB) to
set the white balance.
For details, refer to page 22.
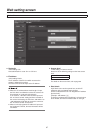
AWB Mode [ATW, AWB A, AWB B]
The white balance mode is selected here.
Select the mode when the coloring is not natural because
of the nature of the light source or other factors.
If the white color serving as the reference can be
recognized, subjects can be shot with natural coloring.
ATW In this mode, the white balance is
compensated for automatically, even if
changes occur in the light source or color
temperature, by a process of continuous and
automatic adjustment.
AWB A,
AWB B
When AWB A or AWB B is selected and the
white balance is executed, the adjustment
results obtained are stored in the memory
selected.
When AWB A or AWB B is then selected, the
white balance stored in the selected memory
can be recalled.
When preset settings have been called from the
AW‑RP655, the AWB mode which was set when
the preset data was registered by the AW‑RP655
will be called.
Note
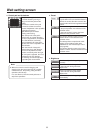
Detail [Off, Low, High]
The image detail (image sharpness) is adjusted here.
When “Low” or “High” is selected, the detail is enhanced.
Flesh Tone Mode [Off, Low, High]
Set here is the flesh tone mode for displaying the
subjects’ skin so that it appears more smoothly and
eye‑pleasingly.
When “Low” or “High” is selected, the effect is enhanced
even more.
Color Matrix [Normal, EBU, NTSC]
This item is used to load the preset color matrix data and
compensate for the saturation and color phase.
DNR [Off, Low, High]
Set here is the level of the digital noise reduction effect so
that light, noise‑free and clear images will be output even
at night and in other low‑brightness environments.
When “Low” or “High” is selected, even more noise can
be eliminated.
However, there is an increased possibility that
afterimages may occur.
Pedestal [–10 to +10]
This item is used to adjust the black level (adjust the
pedestal) so that the dark parts of the images are easier
to see.
These parts become darker when a negative setting is
selected and, conversely, lighter when a positive setting
is selected.
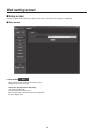
DRS [Off, Low, High]
Set here is the DRS function which provides just the right
amount of compensation when images with significant
light/dark differences are displayed.
When “Low” or “High” is selected, the effect is enhanced
even more.
This may make noise more perceptible with some scenes.
Gamma Type [Off, Normal, Cinema]
Selected here is the type of gamma curve.
The selected setting takes effect when “Off” is selected
as the “DRS” item setting. Normally, the “Normal” setting
is used. When “Cinema” is selected, images giving off an
atmosphere like movies can be shot.
Gamma Level [Low, Mid, High]
This item is used to adjust the gamma compensation
level. The selected setting takes effect when “Off” is
selected as the “DRS” item setting or when “Normal” is
selected as the “Gamma Type” setting.
When “Low” is set, the images appear sedate and
composed. The resulting gamma curve has a gentle
gradient in the low‑brightness areas, and the contrast is
sharper.
Conversely, when “High” is set, the tonal range in the dark
area is expanded so that the images take on a lighter
tone. The resulting gamma curve has a sharp gradient in
the low‑brightness areas, and the contrast is softer.
Back Light COMP. [Off, On]
“On” or “Off” is set here for the backlight compensation
function.
Under backlight conditions, the function prevents
darkening as a result of light striking the backs of
subjects, and makes it possible to shoot images in shade
or shadow more brightly.
This item can be set when “Auto” has been selected as
the “Contrast Mode” setting.
The function takes effect when “Auto” has been selected
as the Contrast Mode, Gain or Frame Mix item setting.
This is used to close this panel.