


38
Chapter 2 Basic Fax Transmission
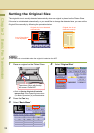
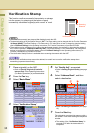
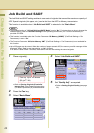
Verification Stamp
This function confirms successful transmission or storage
into the memory by stamping at the bottom of each
successfully transmitted original(s) with a small “x” mark.
z
The scanned document(s) are stamped after feeding through the ADF.
z
The standard setting of the Verification Stamp is “
Off
”. The stamp setting can be changed with the Function Parameter
“
04 Stamp (HOME)
” (Fax/Email Settings > Fax Parameters). For instructions on how to change the standard setting,
refer to
Fax/Email Settings
in the Operating Instructions (For Function Parameters) of provided CD-ROM.
zThe machine can be configured not to stamp the documents stored in the memory by changing the setting of
the Function Parameter
“28 Stamp at Memory XMT” (Fax/Email Settings > Fax Parameters). For instructions
on how to configure the verification stamp, refer to Fax/Email Settings in the Operating Instructions (For
Function Parameters) of provided CD-ROM.
zThe Verification Stamp function is available when scanning documents with the ADF.
zBecause the verification stamp cannot be deleted, be careful not to use the verification stamp when
transmitting important document(s).
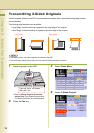
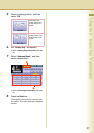
1
Place original(s) on the ADF.
zRefer to Placing Originals (Facsimile/
Internet Fax) in the Operating Instructions
(For Basic Operations) of provided booklet.
2
Press the Fax key.
3
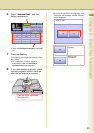
Select “Basic Menu”.
4
Select “Verification Stamp”.
5
Set “Quality Adj.” as required.
zRefer to Setting Original Quality (see page
30).
6
Select “Address Book”, and then
select a destination.
zRefer to Entering a Destination (see page
16).
7
Press the Start key.
The original(s) are stored into memory with a
file number. Then starts dialling the telephone
number.
zThe setting of the “Verification Stamp” is
returned to Off after the transmission is
completed.
Verification Stamp
Ex: Scanning
Direction