


Setting the PS Printer Driver (Mac OS X 10.1 - Mac OS X 10.2)
Macintosh
MacintoshWindows
Basics
112
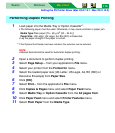
When adding printer with the Print Center application, the computer defines options installed
to the printer automatically. If you install additional options after adding printer, add the printer
again (see the instructions below).
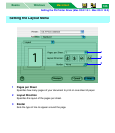
1 Open the Print Center and click KX-P7305, KX-P7310 or KX-P7310-
XXXXXX.
2 Click [Delete].
3 Select Add Printer... from the Printers menu.
4 Choose AppleTalk or USB as the connection type depending on the
connecting interface, and select the printer.
5 Confirm the Printer Model is set to Auto Select... and click Add.
6 Close the Print Center.
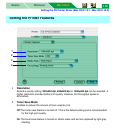
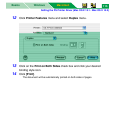
NOTE
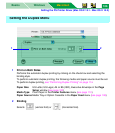
• When using Mac OS X 10.2, manually define the installed options with the Print Center. The
Print Center is in the Utilities folder (Macintosh HD: Applications:Utilities).
(1) Open the Print Center and click the KX-P7305 or KX-P7310 printer.
(2) Select Show Info from the Printers menu.
(3) Select Installable Options from the Name & Location menu.
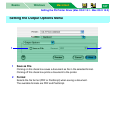
(4) Click on the check box of the installed option or specify the total memory installed in
the printer.
(5) Click [Apply Changes].
(6) Close the Print Center.
Setting the Installed Options