


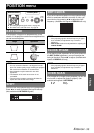

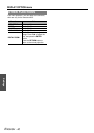

DISPLAY OPTION menu
ENGLISH - 39
Settings
You can switch the logo on/off that is displayed when
starting up the projector. Press I H to select the
required option. STARTUP LOGO will be displayed for
30 seconds.
ON Active
OFF Deactive
USER Display the original text
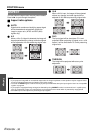
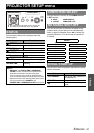
Q Editing the original text
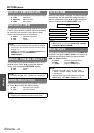
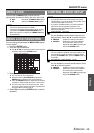
If you select USER, you can display the 2 lines of
original text up to 40 characters in 1 line instead of
the logo.
1. Select USER and press ENTER.
2. Select the required line to enter or edit the original
text, and press the ENTER button.
3. Enter the characters and repeat until finish the line.
Use F G I H to specify the location of the required
character, and press the ENTER button.
Move the cursor to ALL DELETE and press the
ENTER button to delete all the entered text line.
Press the DEFAULT button to delete the last entered
character or indicated with the cursor in the text line.
To insert a character in the entered text line, move
the cursor to the text box to select the required place
and press G to select a character.
4. Select OK and press the ENTER button to set the
entered text in a box.
Press G and edit the TEXT2 if you need to, and
repeat the step 3.
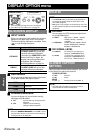
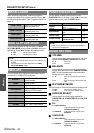
You can turn off the AUTO SETUP button function for
when the COMPUTER signal is detected.
AUTO When the projector detects a
COMPUTER or DVI signal, adjust
the projected image position
automatically for SHIFT, SIGNAL
SEARCH, DOT CLOCK and CLOCK
PHASE.
BUTTON Only when the AUTO SETUP button
is pressed, the projected image
position will be adjusted for DOT
CLOCK and CLOCK PHASE. See
“Remote control” on page 14.
You can turn off the auto signal detecting system.
ON Detect the input signal from the
terminals and project the image.
OFF Deactive
You can choose a BLUE or BLACK screen for when the
projector is idle. Press I H to select the required option.
When projecting WIDE signals, switch to ON to display
the image in well adjusted size.
AUTO Automatic detective system
OFF For 4:3 signals
ON For WIDE signals
(16:9, 16:10 and 15:9)
You can switch the projection mode between SXGA+
and SXGA for SXGA signals. Press I H to select the
required option.
SXGA Smaller setting
SXGA+ Larger setting
STARTUP LOGO
OK CANCEL
ALL DELETE
TEXT CHANGE
AUTO SETUP
NOTE:
• Usually the recommended setting is AUTO.
SIGNAL SEARCH
NOTE:
• SIGNAL SEARCH is not available when any input
signal is projecting.
• Usually the recommended setting is ON.
BACK COLOR
WIDE MODE
SXGA MODE