


Appendix
Technical Information
ENGLISH - 56
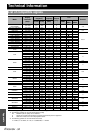
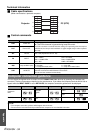
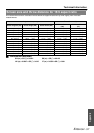
J Pin assignments and signal names
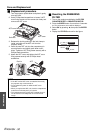
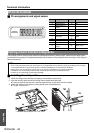
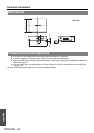
The projector and the ceiling mount bracket are designed sufficiently safety though, make sure the safety cable
provided with the projector is installed and attached to the bottom of the projector when mounting on the ceiling for
safety and security.
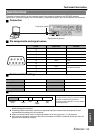
J Installing the safety cable
1. Install the ceiling mount bracket according to the installation instructions.
2. Loop the security cable around the ceiling mount bracket with less slack.
Lace the cable of the end with a latch through the loop on the other end of the cable.
3. Attach the latch on to the bottom of the projector with a provided screw.
Torque: 1.25±0.2 N·m
* Indicated sample above is ET-PKF100S.
DVI-D IN terminal
Pin No. Signal name Pin No. Signal name
1TMDS Data 2- 13
2TMDS Data 2+ 14+5V
3
TMDS Data 2/4
shield
15 GND
4 16 Hot Plug Detect
5 17 TMDS Data 0-
6 DDC clock 18 TMDS Data 0+
7 DDC data 19
TMDS Data 0/5
shield
820
9TMDS Data 1- 21
10 TMDS Data 1+ 22 TMDS clock shield
11
TMDS Data 1/3
shield
23 TMDS clock+
12 24 TMDS clock-
Ceiling mount bracket safeguards
NOTE:
• Even if it is guarantee period, the manufacturer is not responsible for any hazard or damage caused by using a ceiling
mount bracket which is not purchased from an authorized distributors, or environmental conditions.
• Make sure to use a torque driver and do not use an electrical screwdriver or an impact screwdriver.
• Installation work of the ceiling mount bracket should only be carried by a qualified technician.
• Remove an unused ceiling mount bracket promptly.