


119
q
e
r
t
y
w
i
o
u
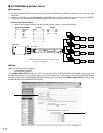
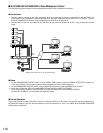
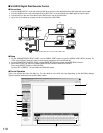
■ WJ-HD100 Digital Disk Recorder Control
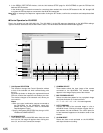
● Connections
1. Connect MONITOR OUT on the rear of the WJ-HD100 to AUX IN on the WJ-NT204 with a BNC attached coaxial cable.
2. Connect VIDEO IN on the rear of the WJ-HD100 to SPOT OUT on the WJ-NT204 with a BNC attached coaxial cable.
3. Connect DATA on the rear of the WJ-NT100 to DATA on the rear of the WJ-NT204.
4. Up to four (4) Combination cameras can be connected to the WJ-NT204.
● Setup
1. On the ADMINISTRATOR SETUP PAGE, click the SERIAL PORT button to open the SERIAL PORT SETUP window. For
TYPE, select PS.Data. Select the same communication parameters as for the WJ-HD100.
2. On the ADMINISTRATOR SETUP PAGE, click the MODE SETUP button to open the MODE SETUP window.
3. Select either H.261 and JPEG in the MAIN PAGE DEFAULT MODE & INDEX FILE SELECT.
Then, select DIRECT COAX for CAM CONTROL.
Click the SET & REBOOT. The transmitter WJ-NT204 will restart.
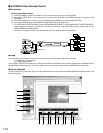
● Control Operation
Type in the location bar http://192.168.0.10/. The 192.168.0.10 in the URL may vary depending on the WJ-NT204 settings.
Type the identical address to that the WJ-NT204 is set to.
LINK/
10BASE-T
100
BASE-TXCONNECT ACT
LOW HIGH
RING.VOL
Network Interface Unit WJ-NT
POWER
ON
OFF
LAN
MONITOR
OUT
DATA VIDEO IN
DATA SPOT OUT AUX IN
WJ-HD100
WJ-NT204
PC
PC
PC
PC
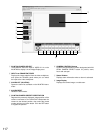
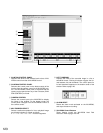
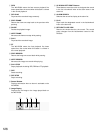
OPERATE
TIMER HDD
ALARM
SUSPEND
DAYLIGHT
SAVINGS
FULL
LOCK
MEMORY CARD
DISPLAY SELECT
STOP
PLAY REC
PUSH– PAUSE
SET
ALARM SEARCH STEP REW/FF
PLAY MODE SELECT
//
/
/
Note: Set DIP switch #3 on the rear of WJ-NT204 to ON.