


36
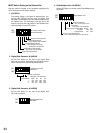
■ 100 CONFIGURATION
This menu lets you set the operating mode and IP address
in the network.
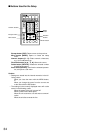
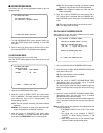
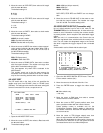
1. Press the MENU button on the Remote Controller to
open the 000 TOP menu.
2. Select the 100 CONFIGURATION with the D or C but-
ton, then press the ENTER button.
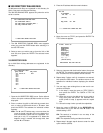
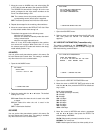
3. Move the cursor to MODE and select either TRANSMIT-
TER or RECEIVER. The default setting is TRANSMIT-
TER.
TRANSMITTER: Select this when the unit is installed in
the Remote site along with cameras.
RECEIVER: Select this when the unit is installed in the
Control site.
4. Move the cursor to VIDEO and select H261 or JPEG
with the A or B button. A standard for video compres-
sion is selected only for the TRANSMITTER.
H261: The unit uses the H.261, ITU-T recommendation.
JPEG: The unit uses the Joint Photographic Experts
Group standard. This standard is applicable only
when the PC site receives video transmission.
5. Move the cursor to IP ADDRESS and enter the number
with the numeric buttons.
6. Move the cursor to SUBNET MASK and enter the num-
ber with the numeric buttons.
7. Move the cursor to DEFAULT GATEWAY and enter the
number with the numeric buttons.
Make certain that the default gateway is set to 0 when
the system is used in the environment not having a
gateway.
8. Move the cursor to the date and time field.
Enter the month, date, year with the numeric buttons,
then hour and minute. Press the ENTER.
9. Move the cursor to DAYLIGHT SAVINGS and select ON
or OFF with the A or B button. The default setting is
OFF.
ON: The internal clock advances by one hour than the
normal time.
OFF: The normal time is applied to the clock.
10. Move the cursor to TRANS. CONTROL and select ON
or OFF with the A or B button. The default setting is
ON.
This setting specifies whether the RECEIVER unit oper-
ates or not the following functions such as camera con-
trol, serial port control and parallel port control.
ON: The unit is enabled to operate these control func-
tions.
OFF: The unit is disabled.
Note: The priority is given to the presently operating
unit when ON is set to more than one unit, and a
collision arises.
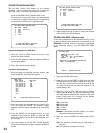
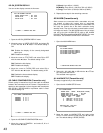
11. The confirmation dialog prompts you to select YES or
NO when pressing the ESC button after changing the
setting.
YES: Select this when you wish to store the new
(changed) settings.
NO: Select this when you wish to retain the previous
settings.
12. Press the ENTER to return the screen back to the
standby mode, or press the ESC button to go back to
the 000 TOP menu. In the standby mode, the monitor
displays camera pictures, not setup menus.
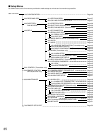
000 TOP
100 CONFIGURATION
↓
(TRANSMITTER)
200 RECEIVING REGI.
↓
300 DIRECTORY/DIALING REGI.
↓
400 SETUP
↓
500 CONTROL
↓
600 MAINTENANCE
↓
700 REMOTE SETUP EDIT
↓
↑↓
:MOVE ENT:SELECT ESC:CLEAR
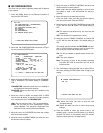
100 CONFIGURATION
MODE : TRANSMITTER RECEIVER
VIDEO : H261 JPEG
IP ADDRESS : 192.168. 0. 10
SUBNET MASK : 255 255.255.0
DEFAULT GATEWAY : 0. 0. 0. 0
DATE/CLOCK
JAN.01.01 MON 00:00
. . : SET
MM.DD.YY HH:MM
DAYLIGHT SAVINGS: ON OFF
TRANS. CONTROL : ON OFF
↑↓
←→
:MOVE
←→
:SELECT DEL:CLR ESC:PRV
CHANGE CONFIGURATION?
YES NO
←→
:SELECT ENT:EXEC ESC:PRV