


Pertech Resources Inc. November 2005 220321A 17
Conguration & Diagnostic Print Tests
Conguration Utility Program
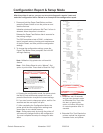
Pertech Provides a Conguration Utility for the 5300
series that is downloadable from the Pertech web site.
The Conguration Utility offers an alternative to the One
Button Conguration explained later in this section. This
utility requires a Windows XP or 2000 operating system
and is easily installed. To install the Utility run setup.exe
and follow instructions on the screen. For updated or
additional information consult the readme / help le
included with the software.
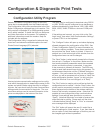
The Conguration Utility is organized in tabs and drop
down box’s and shows the available options for each
Printer Control Language (PCL) selected.
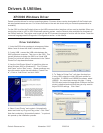
Host and printer communication settings can be cong-
ured within the application to steamline the setup for the
system and printer. Before using the utility to congure
a printer, the user should verify the host communication
settings match the connection to the printer. The com-
munication settings used to transmit information to the
printer are displayed on the bottom of the form
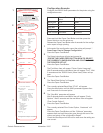
The utility may be congured to download using RS232
or USB. RS232 may be congured to use hardware or
software handshaking, baud rates of 1200, 2400, 4800,
9600, 19200, 38400, 57600 on a choice of COM ports
1-9.
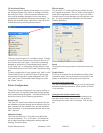
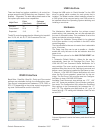
If the settings are incorrect, you may click on the “Set-
tings” menu, then select “Host Communication Settings”,
or press CTRL-H on the keyboard.
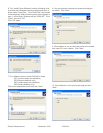
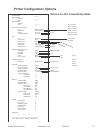
The “Congure” button will open up a window displaying
allowed changes to the conguration of the 5300. See
“Printer Conguration Options” for more information on
the various options available. These items are what will
be sent when the “Send” button is clicked. If there is a
padlock icon in the bottom right of this window, then the
conguration items can not be changed.
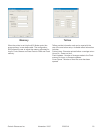
The “Send” button is what actually transmits the informa-
tion set up in “Congure” to the printer. Make sure the
host communications parameters match the connected
printer, and that the printer is connected. It may take
a few moments to transmit all the data. The 5300 may
need to reset itself several times during this process. Do
not disconnect the printer until the “Finished” dialog box
appears. If for some reason the utility can not congure
an item, you will be prompted with a choice to “Abort” the
entire conguration process, “Ignore” (or skip) only the
particular item that it can not congure, or to “Retry”.
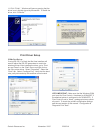
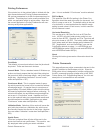
The “Print” button is used to print a self-test so that the
conguration can be veried. Like the “Send” button, the
printer must be connected, powered on, with the param-
eters displayed on the bottom of the window matching
those of the currently connected printer. (Note that it is
possible to have changed the printer communications
settings if new settings were specied on a previous
“Send”). Note that the printer is not able to receive data
while the ticket is printing. Please wait until the ticket
is nished before clicking “Send” or “Print” or a transmit
error message will be displayed.
The “Exit” button will prompt the user if it would like to
save the settings for a later session. If yes, then there is
also an option to lock those settings, so that they can not
be changed again without a password.