7. INSTALLATION Connecting to a computer
CONNECTING TO A COMPUTER
General
–
Caution: Always switch off the projector before making any connections!
– The data input is suitable for both Apple Macintosh computers (Power Book and Power Mac) as well as for IBM compatible PCs.
– The data output of IBM compatible PCs can be connected directly to the projector using standard data cables.
Apple Macintosh computers may need a conversion plug (optional) added to the standard data cable.
– The figures in brackets
(1)
correspond to the figures in the diagram on page 10.
The characters in brackets
(a)
correspond to the characters in
fig. 2
on page 3.
11
English
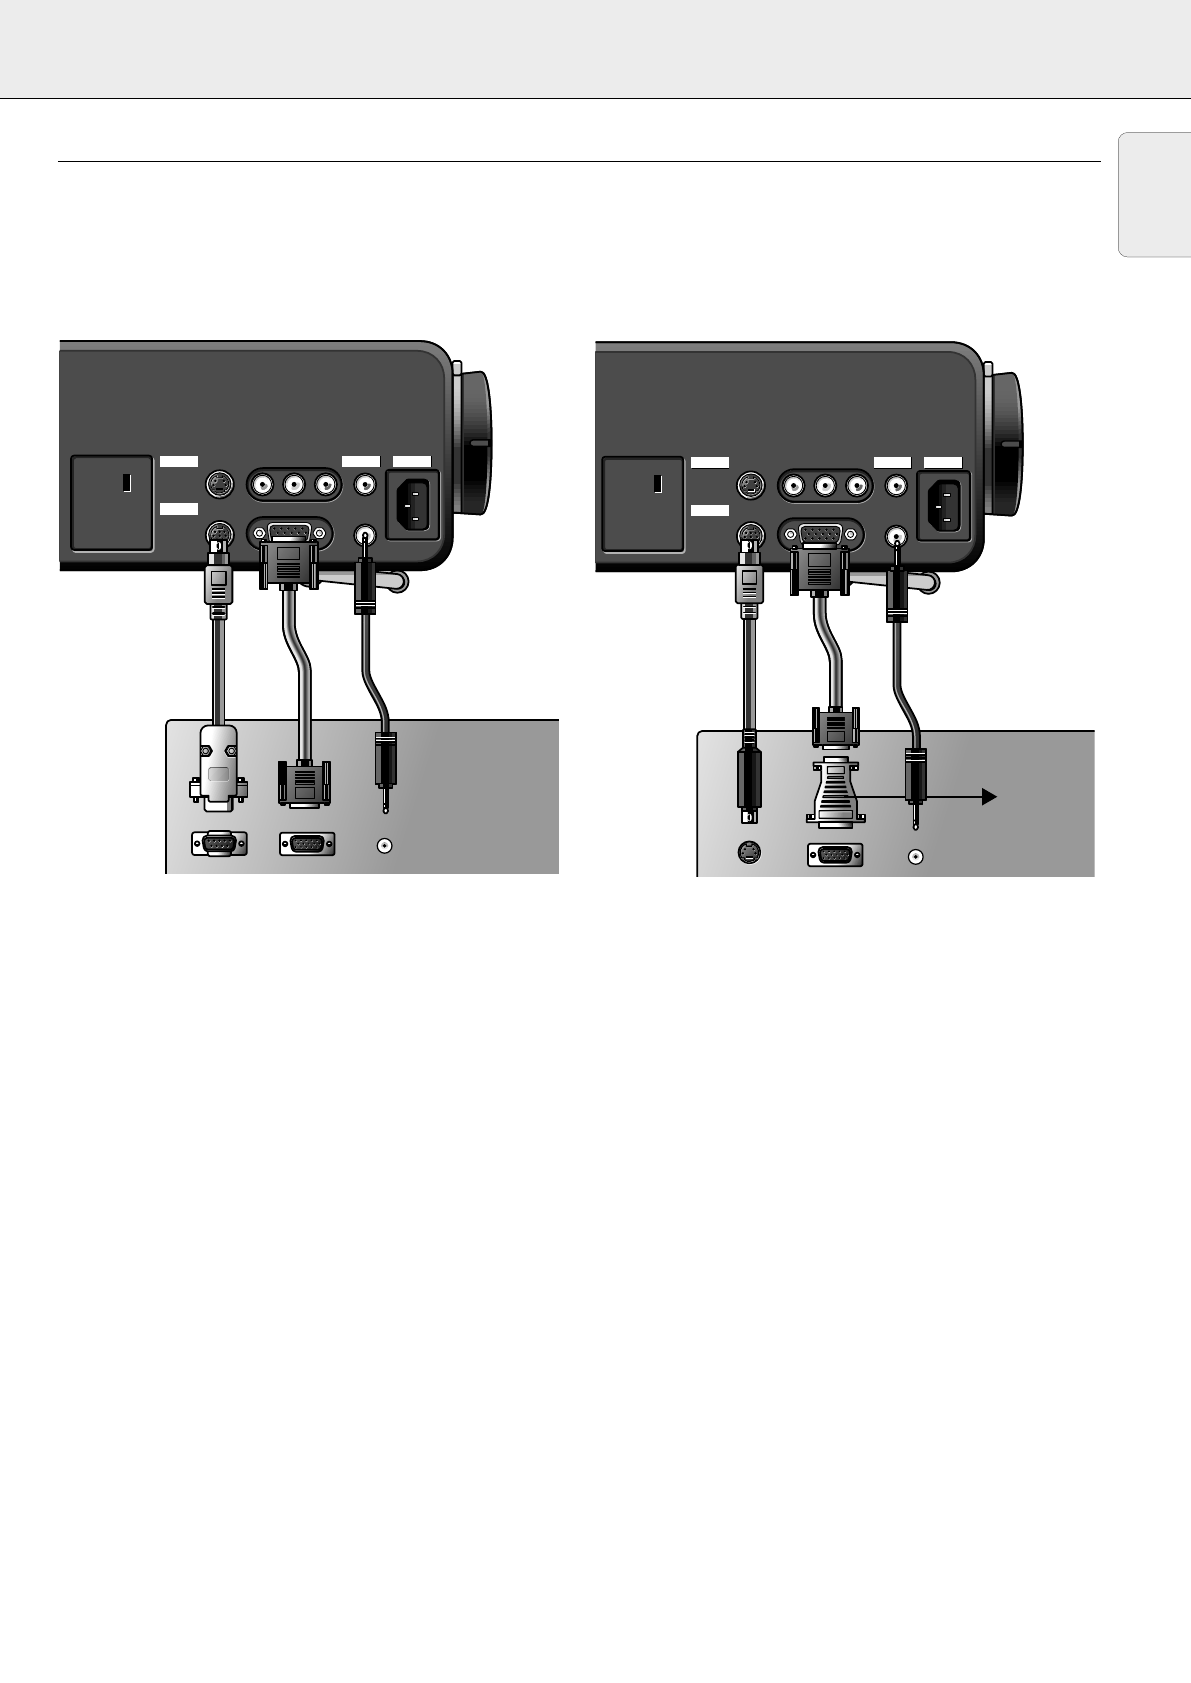
PC (Desk Top/Lap Top)
1.
Connect the DATA OUT terminal of the computer to the DATA
terminal
(b)
of the projector and secure the plugs by tightening
the thumb screws.
For this, use the VGA cable
(1)
supplied.
2.
Connect the serial port of the computer to the MOUSE terminal
(a)
of the projector.
For this, use the mouse cable
(4)
supplied.
– You can now manipulate the mouse cursor on the computer
and on the screen, using Cursor Control.
3.
If you wish to use audio, connect the AUDIO OUT socket of the
computer to the AUDIO IN socket
(c)
of the projector.
For this, use an optional audio cable.
Notes:
– If the mouse cursor does not react when moving the track ball
on the remote control:
• check that the Remote Control indicator on the projector
flashes green when you move the trackball.
–
If it does not: Check that you have switched on the remote
control. If you have, check that the batteries are installed
properly and/or replace the batteries.
–
If it does: Install the proper remote control software on your
computer as described in the chapter ‘Additional information’.
If the mouse cursor does not react when moving the directional
shuttle on the projector:
• Install the proper remote control software on your computer
as described in the chapter ‘Additional information’.
– For computers with a PS2 mouse port:
The projector does not support the PS2 mouse protocol. To
operate the mouse function:
• connect the projector to the serial port of the computer as
indicated above.
• Install the proper remote control software on your computer
as described in the chapter ‘Additional information’.
Sometimes your computer will require that the serial port is
enabled separately. Please check the documentation of your
computer for details.
MACINTOSH (Desk Top/Power Book/Power Mac)
1.
Connect the DATA OUT terminal of the computer to the DATA
IN terminal
(b)
of the projector and secure the plugs by
tightening the thumb screws.
For this, use the VGA cable
(1)
supplied.
2.
Connect the ADB port of the computer to the MOUSE terminal
(a)
of the projector.
For this, use the mouse cable
(5)
supplied.
– You can now manipulate the mouse cursor on the computer
and on the screen, using Cursor Control.
3.
If you wish to use audio, connect the AUDIO OUT socket of the
computer to the AUDIO IN socket
(c)
of the projector.
For this, use an optional audio cable.
Notes:
– For older versions of Apple Macintosh computers an optional
VGA/MAC adaptor may be needed. In this case:
• Connect the optional VGA/MAC adaptor to the DATA OUT
terminal of the computer and secure the plugs by tightening
the thumb screws.
•
Select the required resolution for your monitor in the
diagram on the back of the adaptor and adjust the
dipswitches accordingly.
• Plug the VGA cable (1) supplied into both the adaptor and the
DATA IN terminal (b) of the projector and secure the plugs by
tightening the thumb screws.
• Proceed with step 2. (see above).
– If he mouse cursor does not react when moving the track ball
on the remote control:
• Check that the Remote Control indicator on the projector
flashes green when you move the trackball.
–
If not: Check that you have switched on the remote control.
If you have, check if the batteries are installed properly and/or
replace the batteries.
15
Audio out
Data out
Mouse
Audio out
Data out
Mouse
Projector
Mac
ctor
Mouse Data in
S-Video in Video in Audio
out
Audio
in
LR
Mouse Data in
S-Video in Video in Audio
out
Audio
in
LR
Power
Data
AudioVideo
Projector
Optional
Optional
PC
1
4 Optional
ctor
Mouse Data in
S-Video in Video in Audio
out
Audio
in
LR
Mouse Data in
S-Video in Video in Audio
out
Audio
in
LR
Power
Data
AudioVideo
Audio out
Data out
Mouse
Audio out
Data out
Mouse
Projector


