


9. ADDITIONAL INFORMATION
Remote control & RS-232 PC software/Maintenance
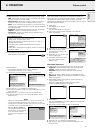
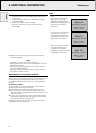
INSTALLING THE REMOTE CONTROL SOFTWARE
This chapter describes how to install and use your pointing device
software. Installation is only necessary if the mouse cursor cannot
be manipulated by the remote control Cursor Control, after making
all necessary connections.
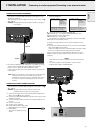
For Macintosh users:
1.
Turn off your computer and connect the supplied remote mouse
cable (ADB) between the projector and the ADB port
2.
Switch-on your computer; you can immediately operate your
mouse via the Remote Control
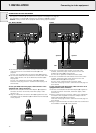
For PC users:
1.
Turn off your PC and connect the supplied remote mouse cable
(RS232) between the computer and the projector
2.
Switch-on your PC; you can now operate your mouse via the
remote control;
if not, please continue:
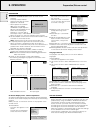
For Windows users:
1.
Double click on the remote control software file
(ex. m83setup.exe)
2.
Follow installation instructions.
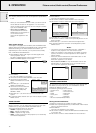
3.
Re-boot your computer.
– A dialog box appears, asking to install a new hardware driver for
a Logitech serial mouse.
4.
Select the Windows default driver (click OK).
– You should now be able to control your PC mouse via the
remote control.
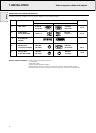
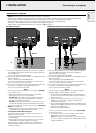
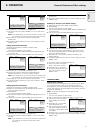
RS–232C PC CONTROL INTERFACE SOFTWARE
The projector operation and settings can be remotely controlled by
a computer or a dedicated environment control system, by
connecting the controller to the serial port of the projector and
using the RS-232C PC Control Interface.
This feature can, for instance, be useful in the following situations:
• dedicated conference environments, where lighting and
sound conditions are controlled by a dedicated system,
•
in situations where multiple projectors are used and the picture
content or performance needs to be synchronised,
•
in case the projector is mounted in a position where direct
control or control via the infrared remote control is difficult.
Please contact your dealer or local Philips representative for details.
CLEANING
CAUTION: Switch off and disconnect the projector before cleaning.
1.
When the cabinet is dusty, clean it by gently wiping with a soft
cloth.
2.
A chamois leather slightly moistened with water is sufficient for
cleaning the housing.
3.
Do not use cleaning agents as they may harm the housing.
Always keep the lens clean
1.
When the lens is dirty or dusty, first blow the dust off and then
gently wipe with a soft brush or lens cleaning paper.
Never touch the lens with your fingers.
2.
The lens is likely to become mouldy if left dirty.
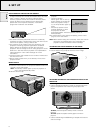
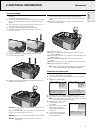
CLEANING THE DUST FILTER
1.
Press the STANDBY ON/OFF button to switch off the
projector.
– The standby indicator lights up red.
2.
Wait until the cooling fan has stopped (about 3 minutes
after the projector has been switched off) and disconnect
the mains lead and all other cables.
3.
Turn the projector over.
Never place the projector on the
side where the connections are located!
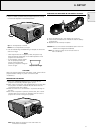
4.
Unscrew and remove both horizontal adjusters.
5.
Unscrew the screws at the bottom of the cover and
remove the cover.
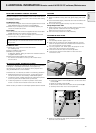
6.
Remove the filter from its compartment.
•
Press both sides of the filter
(a)
until it comes loose from
the clips
(b).
•
Move the handle to the left
(c).
•
Remove the handle from the catch and lift upwards
(d).
•
Carefully lift the filter out of its compartment.
7.
While firmly holding the filter, gently remove any accumulated
dust with a vacuum cleaner.
c
a
a
d
b
b
Hopper SV10
Hopper SV10
Hopper SV10
Hopper SV10
Please continue with the following instructions, if this is the
first time that you use the Remote control mouse function
with your PC.
19
English