


PROBLEM
– POSSIBLE CAUSE
• SOLUTION
Image is not displayed
– Mains lead is not correctly connected.
• Correctly connect mains lead.
– The filter holder is not installed correctly or is damaged.
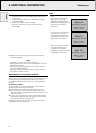
• Install the filter holder correctly (see ‘Cleaning the dust filter’
under Additional Information’).
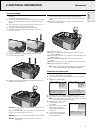
– Lamp holder cover is not closed correctly or the lamp holder
is damaged.
• Close the cover correctly (see ‘Lamp replacement’ under
Additional Information’).
– Signal cable not correctly connected.
• Connect signal cable correctly.
– The projector is in OFF position.
• Press STANDBY/ON/OFF button to to switch on the projector
ON.
Lamp ceased to operate or does not light up at all
(indicator lights up red)
– Lamp is still hot while the projector attempts to restart the
lamp.
• Do not switch the set off; it will restart the lamp
automatically within a few seconds.
– Lamp circuit failure or worn-out lamp.
• Take the projector to your nearest Service Centre, or
• Replace lamp (see ‘Maintenance’).
– Internal temperature of the projector is too high.
• Wait a few minutes and check to see if the air outlets are
blocked.
• Disconnect and re-connect the mains cord to the projector.
If the temperature in the meantime decreased sufficiently,
the projector will start up in the standby mode.
Lamp indicator blinks orange
– Lamp life is almost expired (less then 100 hours to go).
• See lamp life counter on start up screen for details.
Lamp indicator lights up orange
– Lamp life is expired.
Poor colour
– Wrong video system has been selected.
• Select the correct video system (see ‘Video system
selection’ under ‘Picture Control’).
• Adjust brightness, contrast, saturation or hue (see ‘Video
adjustments’ under ‘Picture Control’).
Image is blurred
– Image is not focused.
• Adjust focus ring.
– Distance between projector and ‘screen’ is not correct.
• Adjust the distance between the projector and the screen.
– Signal cable is not correctly connected.
• Connect signal cable correctly.
Image does not match up with the projected screen
– Horizontal or vertical shift or horizontal size are not adjusted
correctly.
• Adjust horizontal or vertical shift or horizontal size (See ‘Data
adjustments’ under ‘Picture Control’).
Picture rolls
– Signal cable is not correctly connected.
• Connect signal cable correctly.
Picture too bright
– MONITOR OUT has been enabled, while no external monitor
is connected.
• Disable the MONITOR OUT option. Press MENU and use
cursor control to go to the SOURCE item on the menu bar.
Choose MONITOR OUT and select OFF.
Picture too dark or bright with external monitor connected
– MONITOR OUT has been enabled, but the external monitor
is not correctly connected. (The picture on both displays is
too bright)
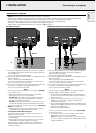
• Connect the (optional) Y-cable (See ‘Connecting to an
external monitor’ under ‘Installation’).
• If the Y-cable is correctly connected, verify whether the input
impedance of the monitor is correctly set on 75 Ohm.
– MONITOR OUT has not been enabled, but the external
monitor is connected. (The picture on both displays is too
dark)
• Enable the MONITOR OUT option. Press MENU and use
cursor control to go to the SOURCE item on the menu bar.
Select MONITOR OUT and select ON.
No sound
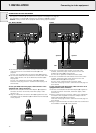
– Audio cable is not correctly connected.
• Connect audio cable correctly.
– Volume is not adjusted.
• Adjust volume.
– Mute or A/V-mute is active.
• Cancel mute or A/V-mute.
The projector does not react to commands from the
remote control
– Remote control is not switched on.
• Switch on the remote control.
– Distance is too great.
• Reduce distance.
– Batteries are exhausted.
• Replace batteries (see ‘Inserting the batteries in the remote
control’).
– IR sensor is obstructed.
• Remove obstacle.
– Proper mouse software has not been installed on your
computer.
• Install proper mouse software.
22
10. TROUBLESHOOTING
English
If a fault occurs, first check the points listed below before taking the projector for repair.
If you are unable to remedy a problem by following these hints, consult your dealer or service organisation.
WARNING
Under no circumstances should you try to repair the projector yourself as this could invalidate the warranty.