


User Manual BDL3215E / BDL4225E
39
NOTE
NOTE 1:
Image Persistence
3OHDVHEHDZDUHWKDW/&'7HFKQRORJ\PD\H[SHULHQFHDSKHQRPHQDNQRZQDV,PDJH3HUVLVWHQFH,PDJH3HUVLVWHQFHRFFXUVZKHQUHVLGXDO
or “ghost” image of the previous image remains visible on the screen. Unlike CRT monitors, LCD monitors’ image persistence is not
permanent, but constant images being displayed for a long period of time should be avoided.
7RDOOHYLDWHLPDJHSHUVLVWHQFHWXUQRIIWKHPRQLWRUIRUDVORQJDVWKHSUHYLRXVLPDJHZDVGLVSOD\HG)RUH[DPSOHLIDQLPDJHZDVRQWKH
monitor for one hour and a residual image remains, the monitor should be turned off for one hour to erase the image.
As with all personal display devices, PHILIPS recommends to display moving images and using a moving panel saving at regular intervals
whenever the screen is idle or the monitor is turned off when not in use.
Please set “POWER SAVE”, “PANEL SAVING”, “DATE AND TIME” and “SCHEDULE” functions to further reduce the risk of Image
persistence.
Image Sticking of LCD Panel
Image Persistence is not permanent, but when fixed image is displayed for long period, ionic impurities inside LCD are accumulated along the
displayed image, and it is observed permanently.
Recommendations
For preventing the fast transition to Image Sticking, and for longer life usage of LCD, the following are recommended.
Do not fixed image to be displayed for a long period of time on screen.1.
In case a fixed image is displayed for a long time, it is advised to activate the pixel shift feature that will periodically move the image in four 2.
directions
When the LCD monitor will not be used for a period of time, turns off the monitor by remote control, uses Power Management Function 3.
or uses “SCHEDULE” function from the monitor menu.
Reducing the environmental temperature is effective for long life use. 4.
When Protection board (glass, acryl) is installed over the LCD surface, enclosed into the box / wall, or stack the monitor, please utilize
the temperature sensors inside monitor.
Accesses “PANEL SAVING” menu and set “BRIGHTNESS” to “ON”.5.
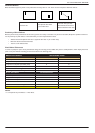
NOTE 2:
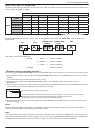
HOW TO SETUP SCHEDULE
Using “SCHEDULE” function allows you to set up to seven different scheduled time intervals when the LCD Monitor will be activated.
6FKHGXOHWKHSRZHURQRIIWLPHRIWKHLQSXWVRXUFH$FKHFNPDUNLQWKHER[QH[WWRWKHQXPEHURIWKHVFKHGXOHLQGLFDWHVWKDWWKH
selected schedule is in effect.
Press o or œ button to move the number (1 to 7) of the schedule to make the selection.
Press (+) or (-) button to move the cursor horizontally within the particular schedule. Press o or œ button to increase time and select
LQSXWVSRW7KH´6(7µEXWWRQLVXVHGWRFRQÀUPDVHOHFWLRQ
If you create a schedule, but do not want to use the power on time, select “--” in the “ON” time slot.
If you do not want to use the power off time, select “--” in the OFF time slot.
If there is no input selected (“--” showing in the input spot), the input from the previous schedule will be used.
The selection of EVERY DAY within a schedule takes priority over other schedules that are set up to operate weekly. When schedules are
overlapping, scheduled Power ON time has priority over scheduled Power OFF time.
If there are two schedules programmed for the same time, then the earliest / highest numbered scheduled has priority.