


Your Proxima Desktop Projector™ 4100/4200
1-3
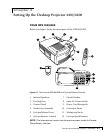
QUICK START
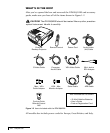
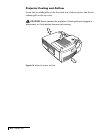
Place the DP4100/4200 on a solid flat surface at a right angle
(perpendicular) to the projection screen, parallel to the floor. Follow the
appropriate section below for the type of system that you have.
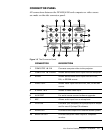
NOTE: The DP4100/4200 has two sets of computer video and audio inputs.
The following examples describe the use of input 1.
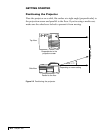
Desktop PCs
1 Unplug the monitor cable from the computer.
2 Plug the end of the supplied VGA cable with the large round collar into
the COMPUTER 1 IN port on the projector. Plug the other end into the
computer Monitor Out port.
3 Connect your audio source to the COMPUTER 1 AUDIO inputs on the
projector.
4 You can project without using the PC monitor. To use the monitor, plug
the monitor cable into the MONITOR OUT port on the projector.
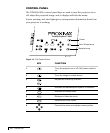
5 Turn the projector on and press the key.
Desktop Macintosh Computers
1 Unplug the monitor cable from the computer.
2 Plug the end of the supplied VGA video cable with the large round collar
into the COMPUTER 1 IN port on the projector. Attach the VGA end of
the Mac - VGA cable adapter to the other end of the VGA video cable.
3 Plug the Mac end of the Mac - VGA cable adapter into your computer's
video port.
4 Connect your audio source to the COMPUTER 1 AUDIO inputs on the
projector.
5 To project and view the monitor at the same time, plug the monitor cable
into the Mac end of the VGA - Mac monitor adapter.
NOTE: The DP4100/4200 only supports the Multi-Sync standard as separate
monitors for Macintosh desktop computers.
6 Plug the VGA end of the VGA -Mac monitor adapter into the MONITOR
OUT port on the projector.
7 Turn the projector on and press the key.