40
Weather
41
Weather
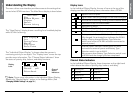
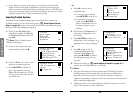
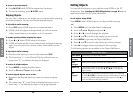
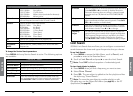
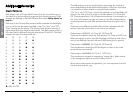
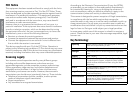
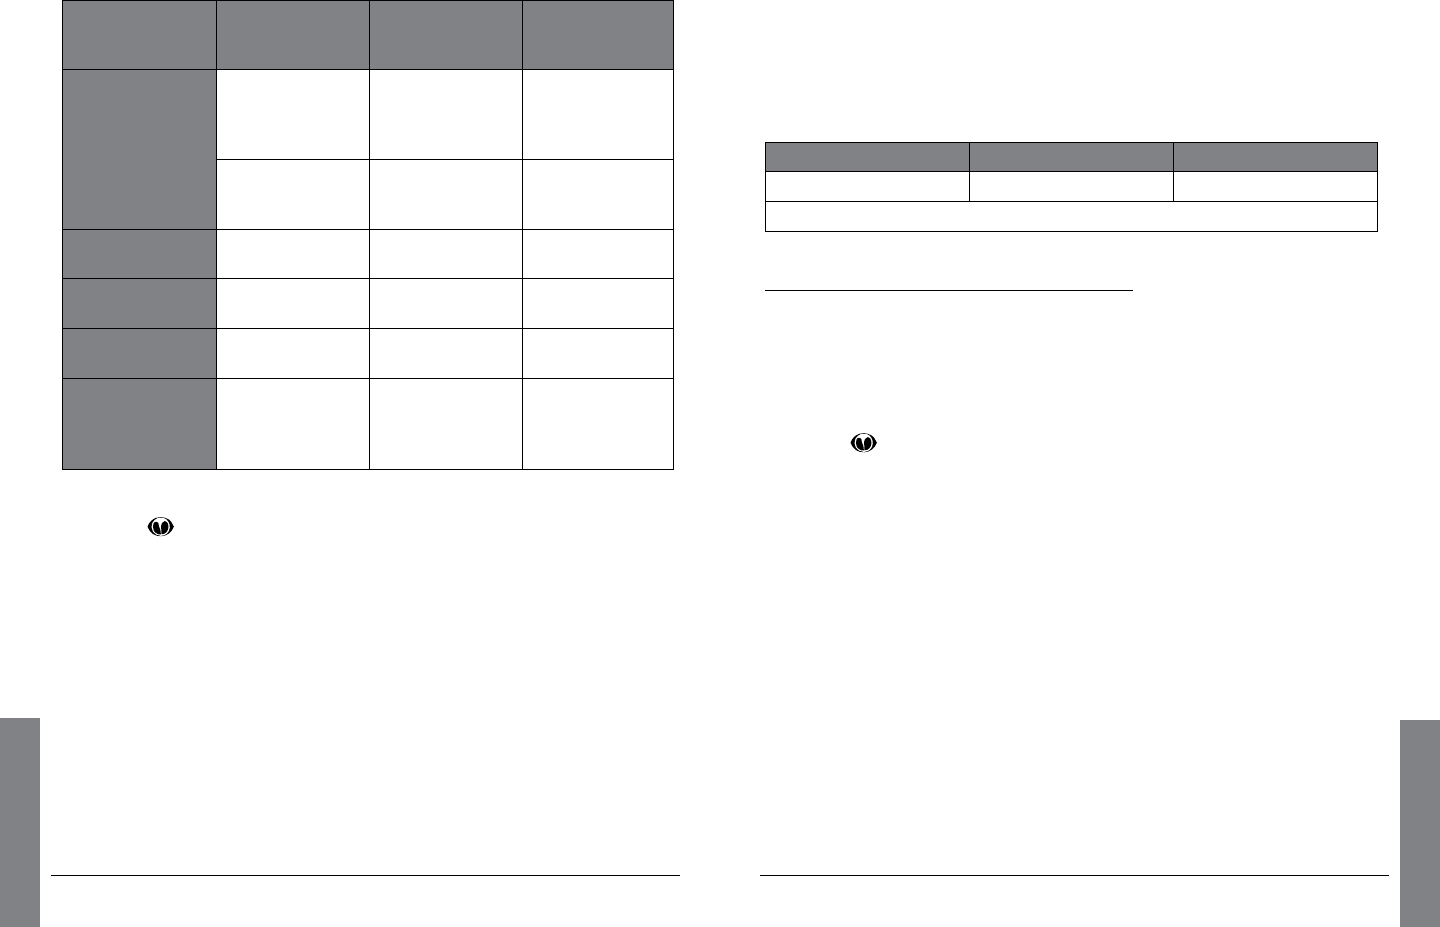
n Note: Weather Priority does not work in all scanning modes. See
the following table for Weather Priority operation.
Normal Priority
is ONandWX
Priority is ON
Normal Priority
is ONandWX
Priority is Off
Normal Priority
is OFFandWX
Priority is ON
Scan (Play)
Mode
Checks both
Normal Priority
channelandWX
Priority chanel
Check only
Normal Priority
channel
ChecksonlyWX
Priority channel
Alert displays
when 1050Hz
tone is detected
No Alert Alert displays
when 1050Hz
tone is detected
Signal Stalker II
Mode
No Priority
Operation
No Priority
Operation
No Priority
Operation
Search Mode
No Priority
Operation
No Priority
Operation
No Priority
Operation
WX Mode
No Priority
Operation
No Priority
Operation
No Priority
Operation
While Browsing
Objects
(-Browser- is
displayed)
No Priority
Operation
No Priority
Operation
No Priority
Operation
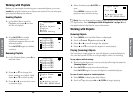
To set the Weather Priority channel:
1. Press
, then press or to select the strongest NOAA
channel for your area.
2. Press MENU and scroll to
Priority.
3. Press or to select the NOAA weather radio channel that you
identified in step 1.
4. Scroll to
Save Changes and press /II/SEL or to save.
SAME Standby Mode
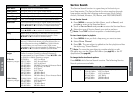
About SAME Signals
Each weather alert is preceded with a digitally encoded SAME
(SpecicAreaMessageEncoding)signal,thena1050Hztone.
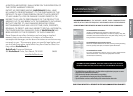
The SAME signal includes a FIPS(FederalInformationProcessing
Standard)codeandaneventcodethatcorrespondswiththetypeof
alert being sent. The FIPS code format is:
Subdivisions State County
0-9(0=entirearea) 01-50(00=allstates) XXX(000=allcounties)
Example: 048439(0=entirearea;48=Texas;439=TarrantCounty)
n Note: AcurrentlistofFIPScodesislocatedat:
www.NWS.NOAA.gov/NWRindexnw.htm.
Programming FIPS Codes
You can specify SAME alerts for up to ten locations by programming
the FIPS codes for the subdivision, state, or county. Before you can
use SAME Standby Mode, you must program at least one FIPS code.
1. Press
to activate Weather Mode, then press MENU.
2. Scroll to
SAME 1 Tag and press to enter a name for the SAME
1 location.
3. Follow the on screen instructions to create and save the name.
4. Scroll down to
SAME 1 FIPS and press to enter a FIPS code
for SAME 1.
5. Follow the on-screen instructions to enter and save the FIPS
code for your local area.
6. Scroll down to
SAME 1 Enable and press /II/SEL or to enable
the SAME 1 location.
7. Repeat steps 2-6 if you want to program SAME information for
other areas.
8. When finished, Scroll to
Save Changes and press /II/SEL or
to save changes, or
press MENU and follow the on-screen
instructions to save changes and exit.