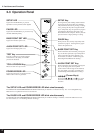
9
5 Basic Operation
5-5 Loading/Removing the Material
Loading the Material
Material with a width (horizontal dimension) of 279.4 mm (11") to 406.4 mm (16") can be loaded.
Any length (vertical dimension) of 110 mm (4-3/8") or more is acceptable.
• The tool carriage moves when the SETUP key is pressed. Take care to ensure that your hands or other objects do not
get caught in the moving parts.
• A soiled material may impair printing accuracy. If dirt or oils from the hand are transferred to the material when it is
loaded, use a cloth moistened with alcohol to wipe the material clean before printing.
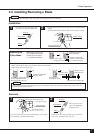
1
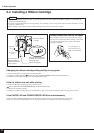
1) Lower the sheet loading levers to raise the
pinch rollers.
2) Makes sure the right-hand pinch roller is
positioned above the right-hand grit roller.
If it is not, move the right-hand pinch roller
to the right until the two rollers touch.
3) Pass the material between the pinch rollers
and the grit roller.
* Before attempting to move the pinch roller, be
sure to lower the sheet loading lever.
2 3
Raise
Sheet loading lever
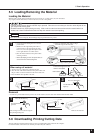
Press the SETUP key.
The SETUP LED
lights up
Removal
* To remove a portion that has been print or cut on roll material, use the cutter tool included with the PNC-5000.
1 2
Press the SETUP key.
The SETUP LED
goes out
The carriages moves to the left edge of
the printing/cutting area.
Lower
Sheet loading lever
Remove the material.
NOTICE
Never move the tool carriage by hand. Damage and poor performance may result.
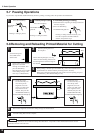
5-6 Downloading Printing/Cutting Data
The unit will begin printing/cutting when it receives printing/cutting data sent from the computer.
For further details, refer to the user's manual provided with your software.
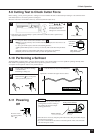
Inner side of the material
When using roll material
1) Set the accessory roller base in back of the unit.
2) Pass the end of the material between the pinch rollers and
the grit rollers so that it extends from the front of the unit.
* Place the Roller base parallel to the unit.
Pull out the length to be used
from the roll material
Roller base FrontRear
Roll material
4) Align with the guide lines
5) Move the left-hand pinch roller to align
it with the edge of the materials.