


ULTRA ATA/133 PCI RAID Card RC200 User Manual
6
In any given RAID set, it’s best to install the hard drives on separate channels, either
Master to Master or Slave to Slave. For example, if you are setting up a RAID set with
two hard drives, install the first drive on IDE1 as Master and the second on IDE2 as
Master. Use the same concept for multiple hard drives.
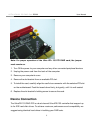
Note: Only the 40-pin/80-wire UltraATA cable can achieve hard disk UDMA 133
performance. When attaching only two hard drives it is recommended that they
be connected on separate IDE channels.
In order to achieve high-speed data transfer, a 40-pin/80-wire Ultra ATA ribbon cable
is recommended. Also, do not mix Ultra ATA/133 hard disk with slow IDE or ATAPI
devices on the same channel.
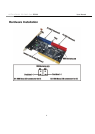
1. If you plan to install two hard disk drives on the IDE1 channel, make sure to
configure one drive as Master and the drive as Slave. Follow the hard drive
manufacturer’s instructions for the correct jumper setting. The same rule must be
followed for connecting hard disk drives to the IDE2 channel.
2. Attach on end of the Ultra ATA cable to the IDE1 connector on the board. Make
sure pin 1 on the cable (indicated by the stripe) matches pin 1 on the IDE1
connector.
3. Install the hard disk drive to your computer. Attach the end connector of the Ultra
ATA cable to the end connector on the hard disk drive. Make certain that pin 1 on
the cable(indicated by the stripe) matches pin 1 on the hard disk drive’s connector
to IDE2
Note: The ribbon cable has two connectors. If you have one hard disk drive,
connect it to the end connector of cable. If you have a second hard disk drive,
connect it to the middle connector of cable.