


Installation
Runco CL-810 Series Owner’s Operating Manual 41
PRE
L
IMINAR
Y
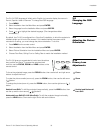
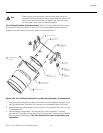
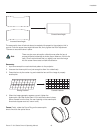
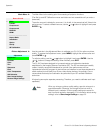
CL-810 Ultra/CineWide (Cylindrical Lens): The CL-810 Ultra Anamorphic lens mount
kit consists of everything shown in
Figure 3-20. Some components shipped with your
projector may differ slightly from what is shown in these instructions.
Figure 3-20. CL-810 Ultra Anamorphic Lens Mounting Assembly - Exploded View
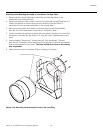
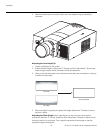
1. Use the Lens Mounting Screws (item #2) to attach the Lens Adapter Ring (item #7) to
the Pitch Adjustment Yoke (item #8). (Use the round, threaded holes on the yoke.)
2. Attach the Mounting Bracket (item #1) to the front of the projector with the four Long
T-Screws (item #4).
3. Use the Height/Y-Adjustment T-Screws (item #5), Pitch Adjustment T-Screws
(item
#6) and T-Nuts (item #3) to attach the Pitch Adjustment Yoke and Lens Adapter
Ring to the Mounting Bracket. The Yoke should be as close to the primary lens
as possible.
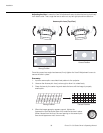
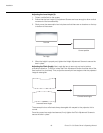
There may be some pincushion distortion even after the lens is
properly adjusted, especially at shorter throw distances. If this is the
case, Runco recommends that you slightly over-scan the image
into the screen frame area to mask the distortion.
Note
2 Lens Mounting
Screw (3x)
1 Mounting Bracket
4 T-Screw,
Long (4x)
5 Height/
Y-Adjustment
T-Screw (2x)
6 Pitch
Adjustment
T-Screw (2x)
3 T-Nut for
Pitch Adjustment
T-Screw (2x)
7 Lens
Adapter Ring
8 Pitch Adjustment
Yoke for Lens
9 Anamorphic Lens
10 Anamorphic Lens
Set Screw