


15
English
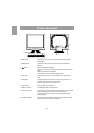
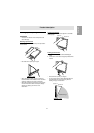
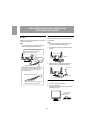
Connecting the monitor and turning the monitor on and off
5. Select the monitor details from the list, then click
[Next], [Next], and [Finish]. If the "Add new
Hardware Wizard" appears, repeat the installa-
tion commands beginning from 2 above.
6. Remove the Utility Disk from the A drive.
If the "Add New Hardware Wizard" has not ap-
peared:
1. Place the Utility Disk in the computer's A drive.
2. Click on the [Start] button. From [Settings],
choose [Control Panel].
3. Double click on [Display].
4. Click on [Settings], [Advanced] and [Monitor].
5. In [Options], check [Automatically detect Plug &
Play monitors] and click on [Change].
6. Check [Specify the location of the driver
[Advanced]] and click [Next].
7. Check [Display a list of all the drivers in a specific
location, so you can select the driver you want.]
and click [Next].
8. When [Models] is displayed, click on [Have disk],
confirm that [Copy manufacturer's files from:] is
[A:], and click [OK].
9. Select the monitor details, then click [Next],
[Next], and [Finish].
10.Check that the monitor details are displayed, then
click [Apply].
11.Click [OK], and close the window.
12.Remove the Utility Disk from the A drive.
For WindowsXP
Installing monitor set-up information into
WindowsXP, and setting the monitor's ICC profile as
a predetermined value.
This explanation assumes that the floppy disk drive
is "A drive".
1. Place the Utility Disk in the computer's A drive.
2. Click on the [Start] button. Choose [Control
Panel].
3. Switch to "Classic View".
4. Double click on [Display].
5. Click on [Settings], [Advanced] and [Monitor].
6. Click on [Properties], [Driver] and [Update
Driver].
7. When [Hardware Update Wizard] appears, check
[Install from a list or specific location [Advanced]]
and click [Next].
8. Check [Don't search. I will choose the driver to
install.] and click [Next].
9. Click on [Have Disk], confirm that [Copy
manufacturer's files from:] is [A:], and click [OK].
10.Select the monitor from the list displayed and
click [Next].
If [has not passed Windows Logo testing...]
appears, click [Continue Anyway].
11.Confirm that the monitor's name appears on the
screen.
12.Click on [Finish].
13.Click on [Close].
14.Click [OK], and close the window.
15.Remove the Utility Disk from the A drive.
Installing the ICC profile
Installing the monitor’s ICC profile. (If the set-up
information has already been installed, so too has
the profile, and there is no need to install it.)
This explanation assumes that the floppy disk drive
is "A drive".
1. Place the Utility Disk in the computer’s A drive.
2. Click on the [Start] button. From [Settings],
choose [Control Panel].
3. Double click on [Display].
4. Click on [Settings] and [Advanced].
5. Click on [General] and from [Compatibility] select
[Apply the new display setting without restarting],
then click on [Color Management].
6. Click [Add], and select [3 ½ Floppy [A:]] as the
file location.
7. Choose the color profile that you would like to
install, and click on [Add].
8. Choose the profile and click on [Set As Default].
9. Click [OK], and close the window.
10.Remove the Utility Disk from the A drive.
- When using the ICC profile, please set the
[WHITE BALANCE] to [STD].