


ENGLISH
21
E
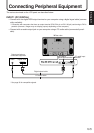
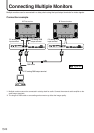
Connection example for RS-232C
Monitors can be externally controlled using the RS-232C interface (COM port) of a PC, and, in this case
too, multiple monitors can be connected in a daisy chain. By assigning each monitor an ID number (see
page 46), you can perform input switching, adjustment and status monitoring of individual monitors.
RS-232C straight cable
RS-232C
INPUT
RS-232C
OUTPUT
RS-232C
OUTPUT
RS-232C
INPUT
To COM port
RS-232C
output terminal
RS-232C
input terminal
RS-232C
output terminal
RS-232C
input terminal
▼ Second monitor
▼ First monitor
▼ PC
Mounting Precautions
• Special techniques are required to mount this monitor, so be sure to rely on an authorized Sharp dealer
for installation work. You should never perform any of this work yourself. Our company will bear no respon-
sibility for accidents or injuries caused by improper mounting or handling.
•Moving or installing the monitor must be done by two or more people.
•Keep the monitor surface perpendicular to a level surface or tilt up to a maximum of 20 degrees down-
ward.
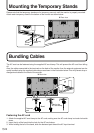
• This monitor is equipped with two temporary stands when shipped from the factory. Please note that
these stands are for temporary use only until the monitor is properly mounted.
• Be sure to use a stand or a wall-mount/ceiling-mount bracket designed or designated for mounting the
monitor.
• Do not lay the monitor display-side down or up as this could lead to a malfunction.
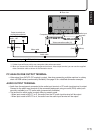
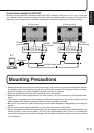
• When mounting the monitor, the following amount of open space is required to clear the ventilation for the
monitor; at least 7.9 inch (20 cm) above, 1.97 inch (5 cm) right/left/below, and 2.76 inch (7 cm) behind the
monitor. Do not block any ventilation openings. If the temperature inside the monitor rises, this could lead
to a malfunction.