


ENGLISH
37
E
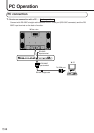
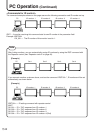
Set-up information (INPUT1 / INPUT2)
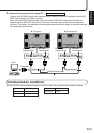
Depending on the type of computer or OS, you may need to install monitor set-up information on your
system. If so, follow the steps below to install monitor set-up information. (Depending on the type of
computer or OS, command names and methods may differ. Please follow the computer’s own operation
manual while reading this.)
Installing set-up information
For Windows 2000
This explanation is for installing and setting monitor set-up information on a Windows 2000 computer,
and it assumes your CD-ROM drive is the “D” drive.
1. Connect the monitor and computer.
2. Load the supplied CD-ROM into the computer’s CD-ROM drive.
3. Click the [Start] button. From [Settings], choose [Control Panel].
4. Double-click [Display].
5. Click [Settings], [Advanced], and [Monitor].
6. Click [Properties], [Driver], and [Update Driver].
7. When the [Upgrade Device Driver Wizard] appears, click [Next].
8. Select [Display a list of the known drivers for this device so that I can choose a specific driver]
and click [Next].
9. When [Models] is displayed, click [Have disk], confirm that [Copy manufacturer’s files from:] is
[D:], and click [OK].
10. Select the monitor from the list displayed and click [Next].
11. Click [Next], confirm that the monitor’s name appears on the screen, and click [Finish]. If [The
Digital Signature Not Found] appears, click [Yes].
12. Click [Close] to close [Display Properties].
13. Click [OK] to close the window.
14. Eject the CD-ROM from the CD-ROM drive.
For Windows XP
This explanation is for installing and setting monitor set-up information on a Windows XP computer,
and it assumes your CD-ROM drive is the “D” drive.
1. Connect the monitor and computer.
2. Load the supplied CD-ROM into the computer’s CD-ROM drive.
3. Click the [Start] button. Choose [Control Panel].
4. Click [Appearance and Themes] and [Display].
When using Classic View, double-click [Display].
5. Click [Settings], [Advanced], and [Monitor].
6. Click [Properties], [Driver], and [Update Driver].
The [Hardware Update Wizard] appears.
When you are asked whether to search Windows Update for the device driver, select [No, not this
time] and click [Next].
7. Select [Install from a list or specific location] and click [Next].
8. Select [Don’t search. I will choose the driver to install.] and click [Next].
9. Click [Have Disk], confirm that [Copy manufacturer’s files from:] is [D:], and click [OK].
10. Select the monitor from the list displayed and click [Next].
If [has not passed Windows Logo testing...] appears, click [Continue Anyway].
11. Confirm that the monitor’s name appears on the screen and click [Finish].
12. Click [Close] to close [Screen Properties].
13. Click [OK] to close the window.
14. Eject the CD-ROM from the CD-ROM drive.