


E-9
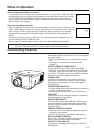
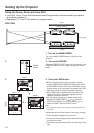
Setting Up the Projector
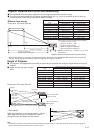
Using the Focus, Zoom and Lens Shift
• Lens Shift, Zoom, Focus and Reversed/Inverted Image mode functions broaden your options
for projector placement.
• See pages 10, 12 and 13 for details on projector setup.
SIDE VIEW
Lens Shift
Zoom
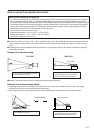
Ceiling setting
Invert Image
Table setting
Zoom
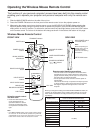
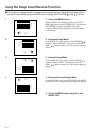
3. Press the LENS button.
• When using the remote control to adjust the picture,
move the MOUSE/ADJUSTMENT sliding switch to the
ADJUSTMENT position. When the LENS button on the
remote control or on the projector is pressed, the LENS
adjustment mode is indicated for about 8 seconds.
• If the LENS button is pressed while the mode is indi-
cated on the screen, the picture adjustment mode
changes as shown on the left.
• You can adjust the picture as shown on the left by
pressing the ADJUSTMENT ( ) or ( ) buttons for
FOCUS and ZOOM or the ADJUSTMENT ( ) or ( )
buttons for SHIFT while in ADJUST mode.
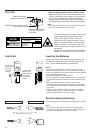
Note:
• Do not attempt to adjust the lens by hand as it may damage the lens
mechanism.
• Adjust the focus until the picture on the screen is sharp.
• The focus pattern appears on the screen.
• The picture can be adjusted to the desired size within
the zoom lens range.
• The picture can be adjusted within the shift range of the
lens.
3
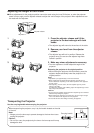
2. Turn on the POWER.
Press the POWER ON/OFF button on the projector or the
POWER ON button on the remote control to turn on the
power.
2
1. Turn on the MAIN POWER.
Turn on the MAIN POWER switch on the side of the
projector.
POWER
indicator
ON/OFF
POWER
LAMP
TEMP.
FOCUS
SHIFT
SHIFT
ZOOM
↔
←
←
←
FOCUS
ZOOM
SHIFT